

Setting up your Cotality Survey Hub Integration
Integrating your Survey Booker account with Survey Hub is very easy. Please follow the steps below to link your accounts.
Navigate to Settings > Integrations > Cotality – Survey Hub.
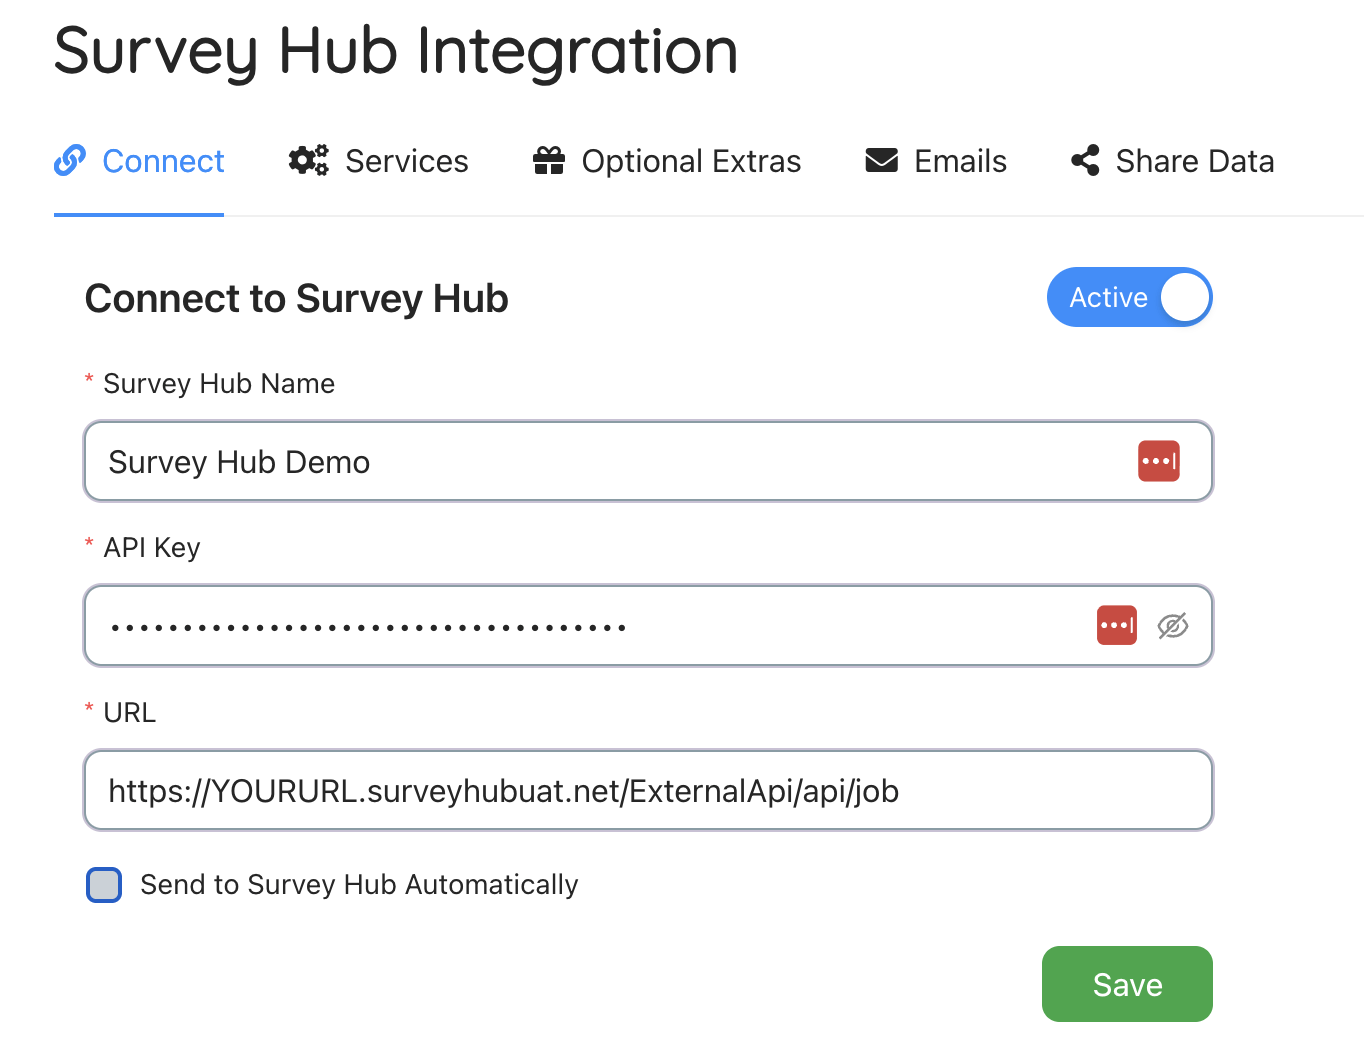
Connect tab
Enter your API key and web hook provided to you by Survey Hub and enter the name you would like to give this integration. This page can also be used to connect other software and so it can be useful to add a name to your integration so it is easy to select the right one to edit if you have several set up.
Your webhook must be saved as: https://yoursurveyhubwebhook/ExternalApi/api/job
Please do not save the webhook ending /Dashboard, or any other ending, or it will not work.
Active/Inactive
This setting allows you to activate or deactivate your feed without deleting all your settings.
Send automatically
This feature pushes the instruction to Survey Hub when you press accept without needing to confirm that you want to send the job to Survey Hub on the pop-up.
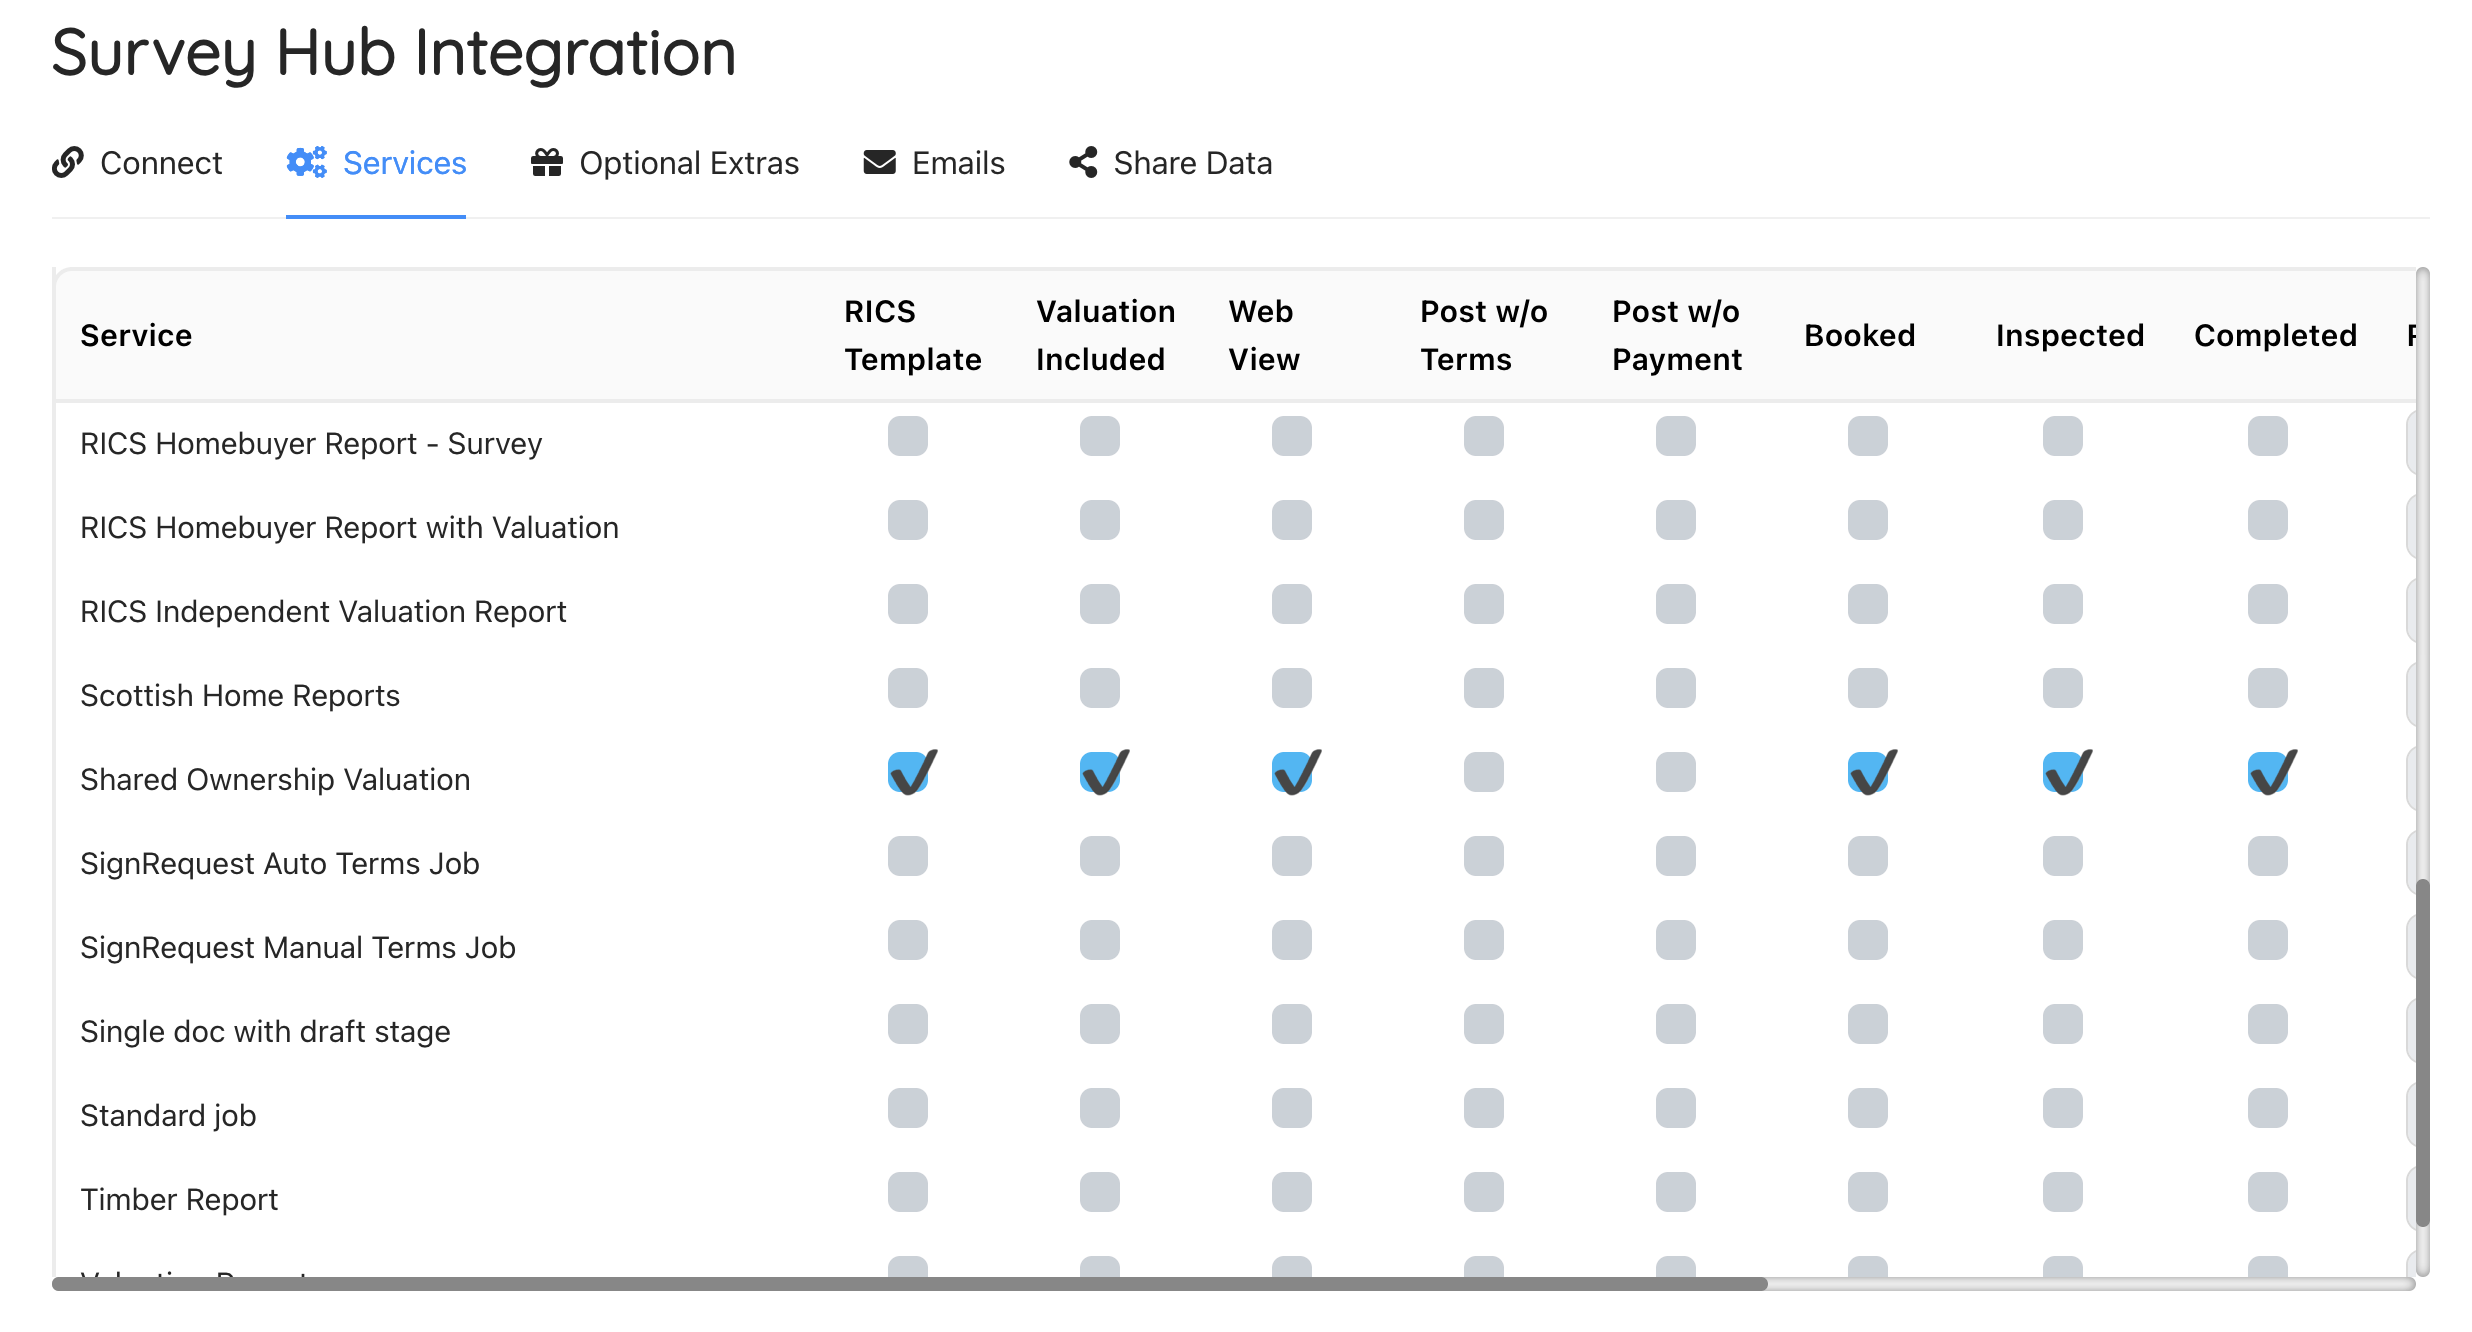
Services tab
Survey types
To the right of the table you can you can select which survey types can be sent to Survey Hub – press the Inactive button to make it “Active”.
Only active services will be included in the Survey Hub feed.
You also need to set:
- RICS Template – set if this report uses the RICS Template
- Valuation Included – set if this job type has a valuation included
- Web View – set it this job type uses the web view or not
- Post w/o Terms – set if the job can be posted to Survey Hub if the terms status is “No”
- Post w/o Payment – set if the job can be posted to Survey Hub if payment hasn’t been made. The payment status is ignored if the billing contact is set as the referrer.
- Booked – if ticked, we can automatically pull back the appointment date from Survey Hub and email the customer. This includes changes if rescheduled.
- Inspected – if ticked, at 4:45pm on the inspection date, we can assume the appointment went ahead and mark the job as Inspected if the appointment date/status hasn’t changed
- Complete
- Single document jobs – we can pull the report back and mark the job as ‘complete’ or ‘in review’ if you have the draft stage on.
- Multi-document jobs – you will need to set which report document we should pull the report back to. We can mark the job as complete or as in review depending on your job settings. To merge the documents, we recommend using the draft stage and merging the report once the document has pulled back.
- Cancelled – if ticked, if the job is cancelled in Survey Hub, we can automatically cancel the job in Survey Booker
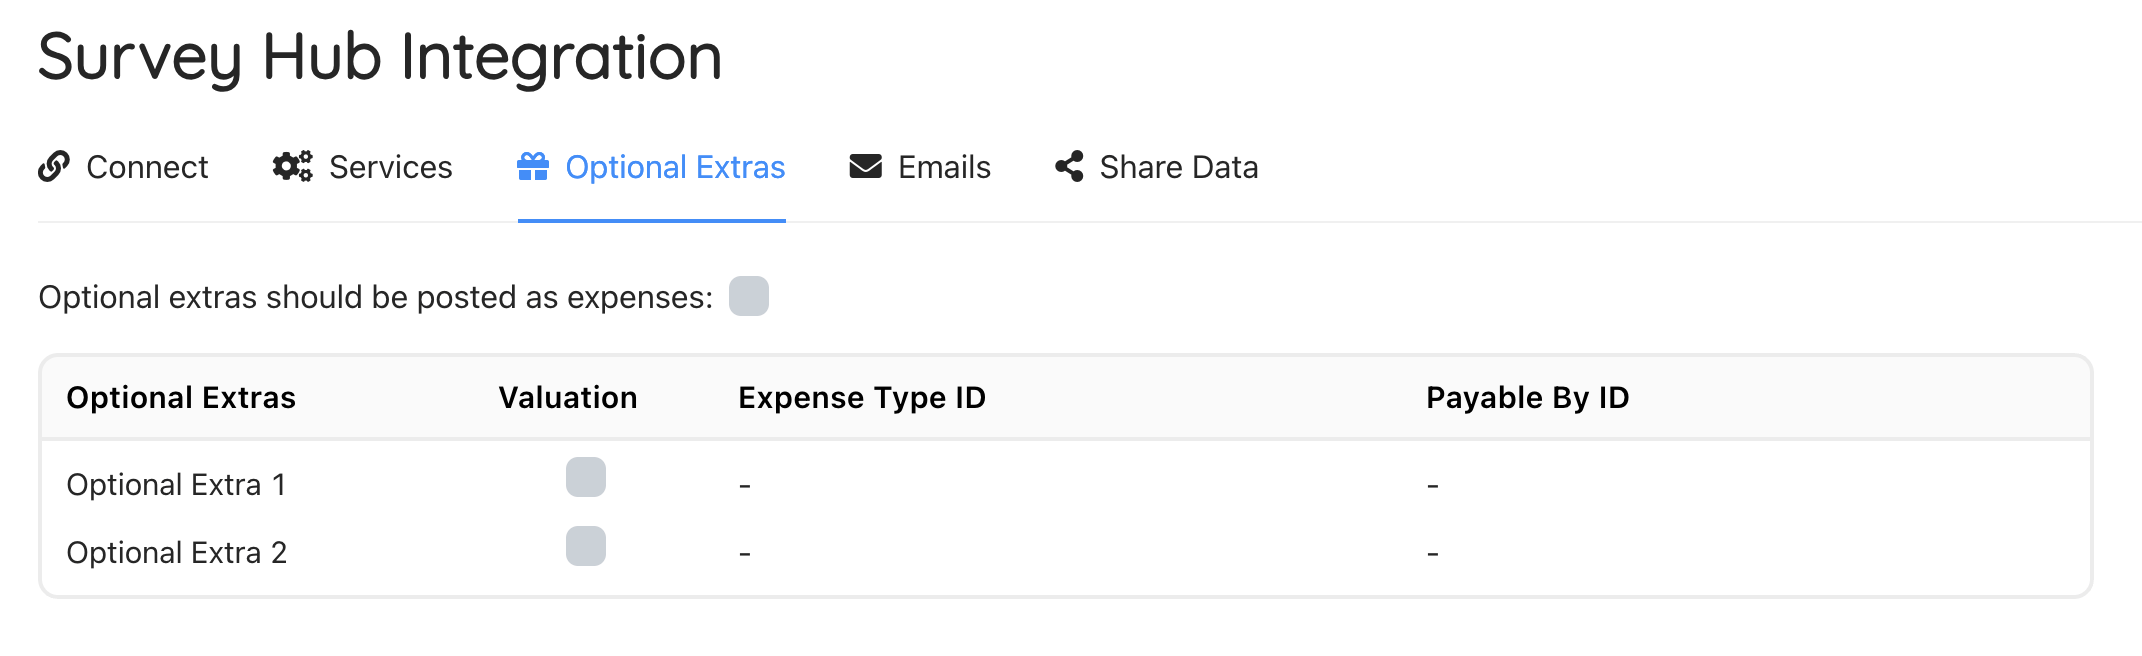
Optional extras tab
If you want any optional extras selected to be posted as expenses, please use this tab to set this up. You will need the Expense Type ID from your Survey Hub account to pair your Survey Booker extra to your Survey Hub expense.
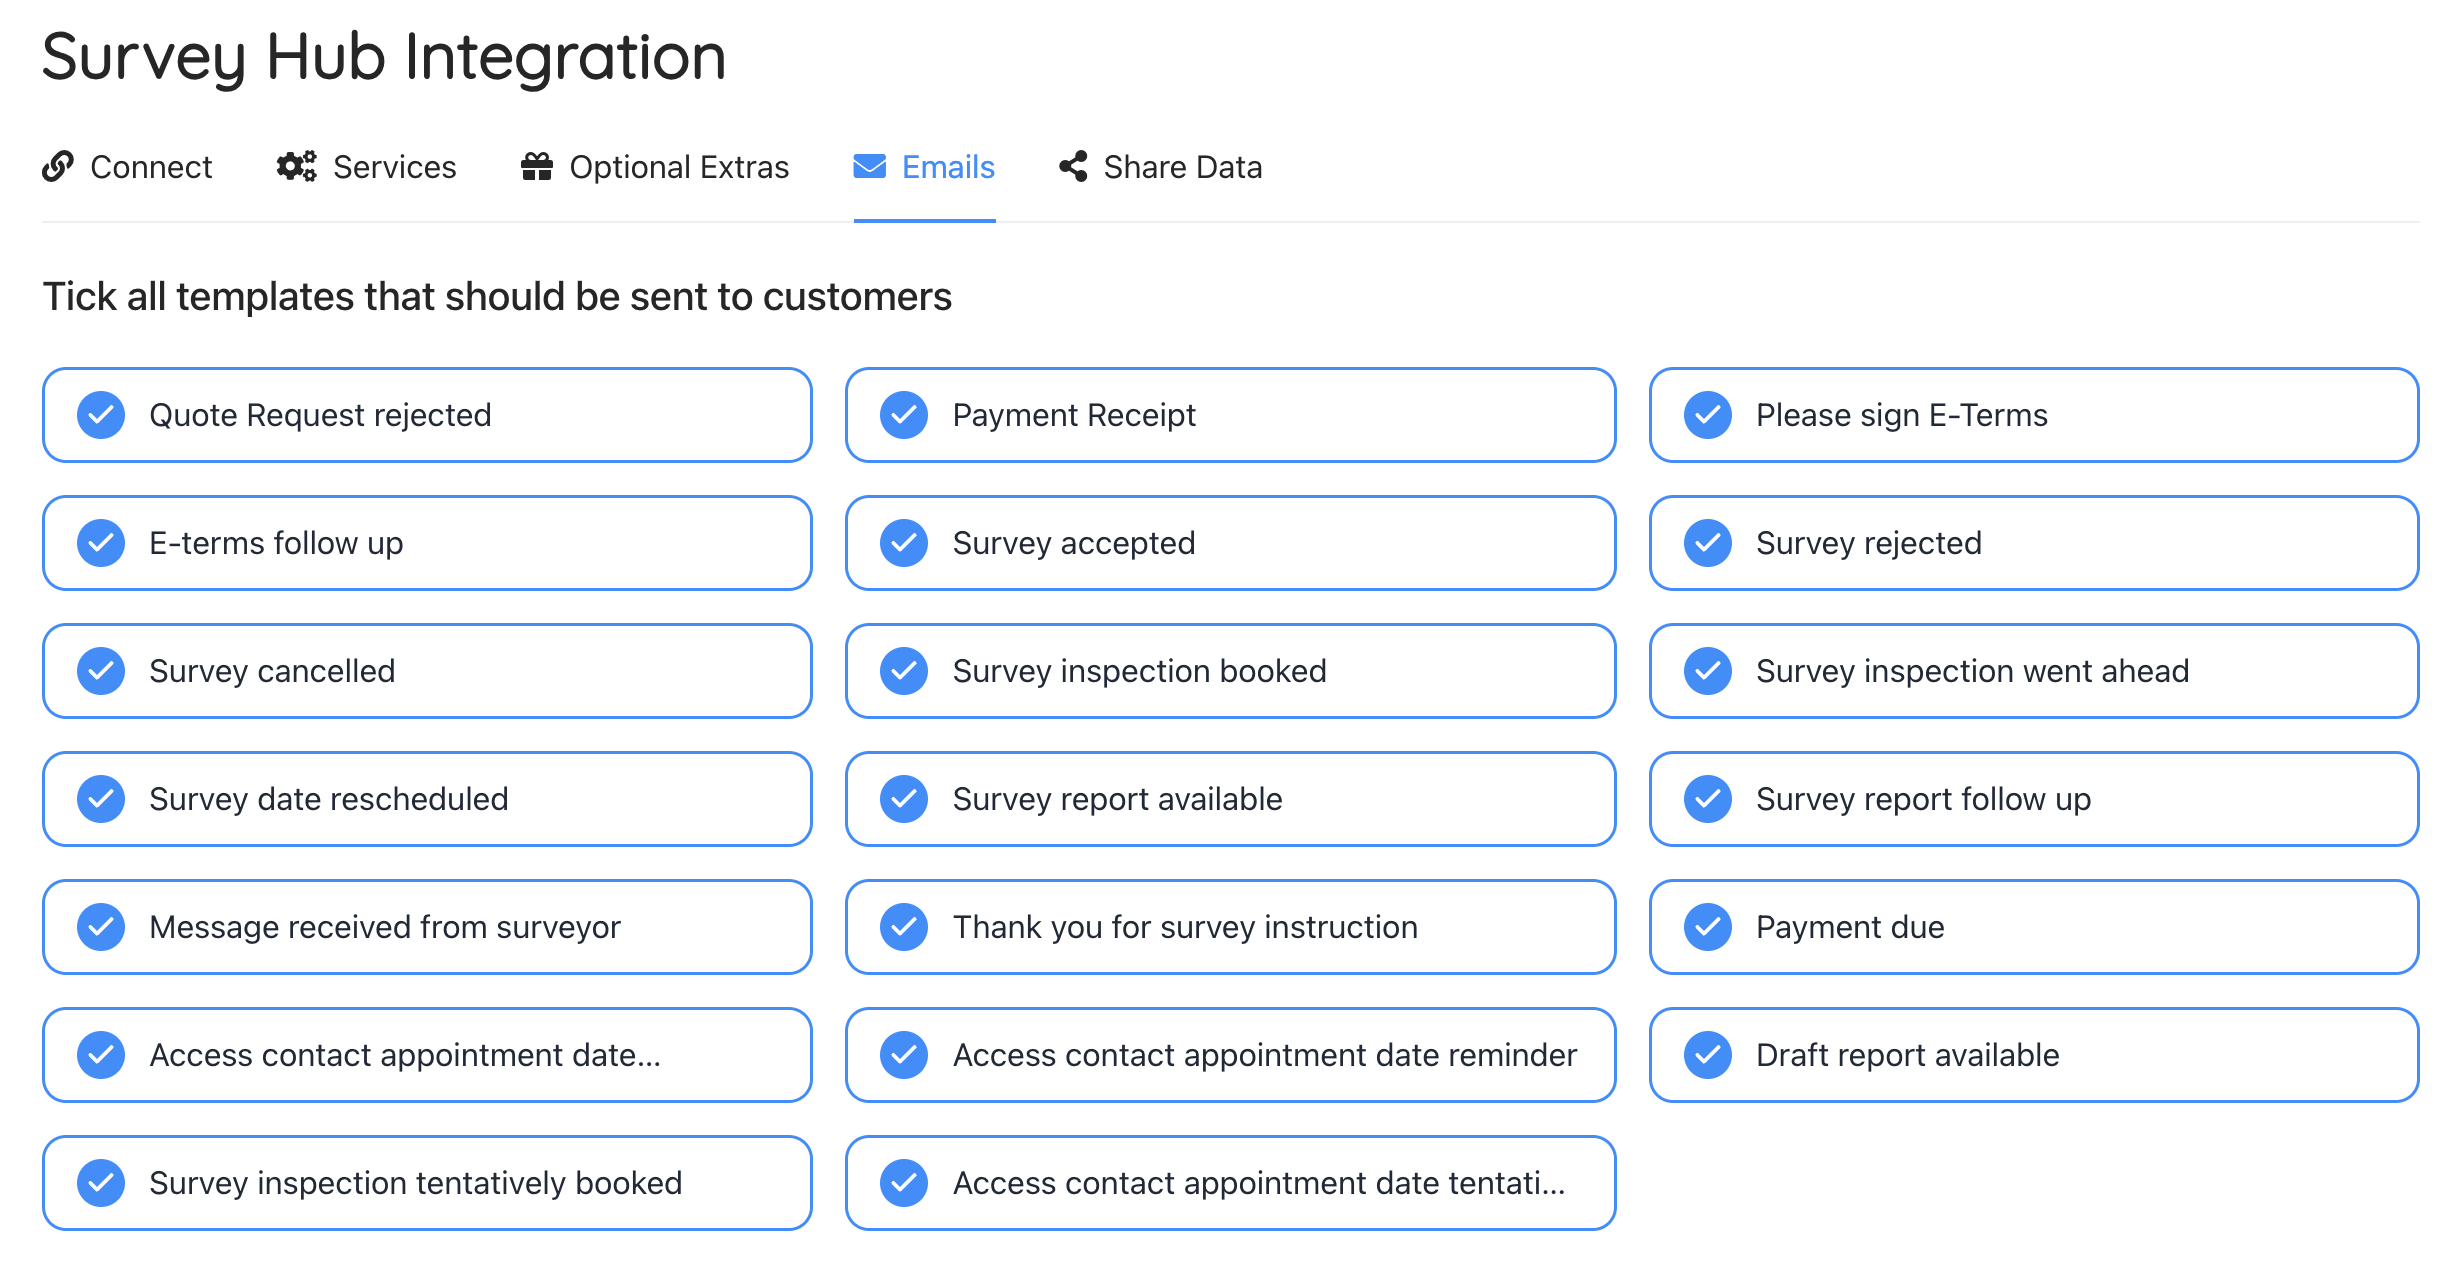
Email settings tab
You can use this tab to set if certain email templates should not be sent our from Survey Booker once it has been sent through to Survey Hub.
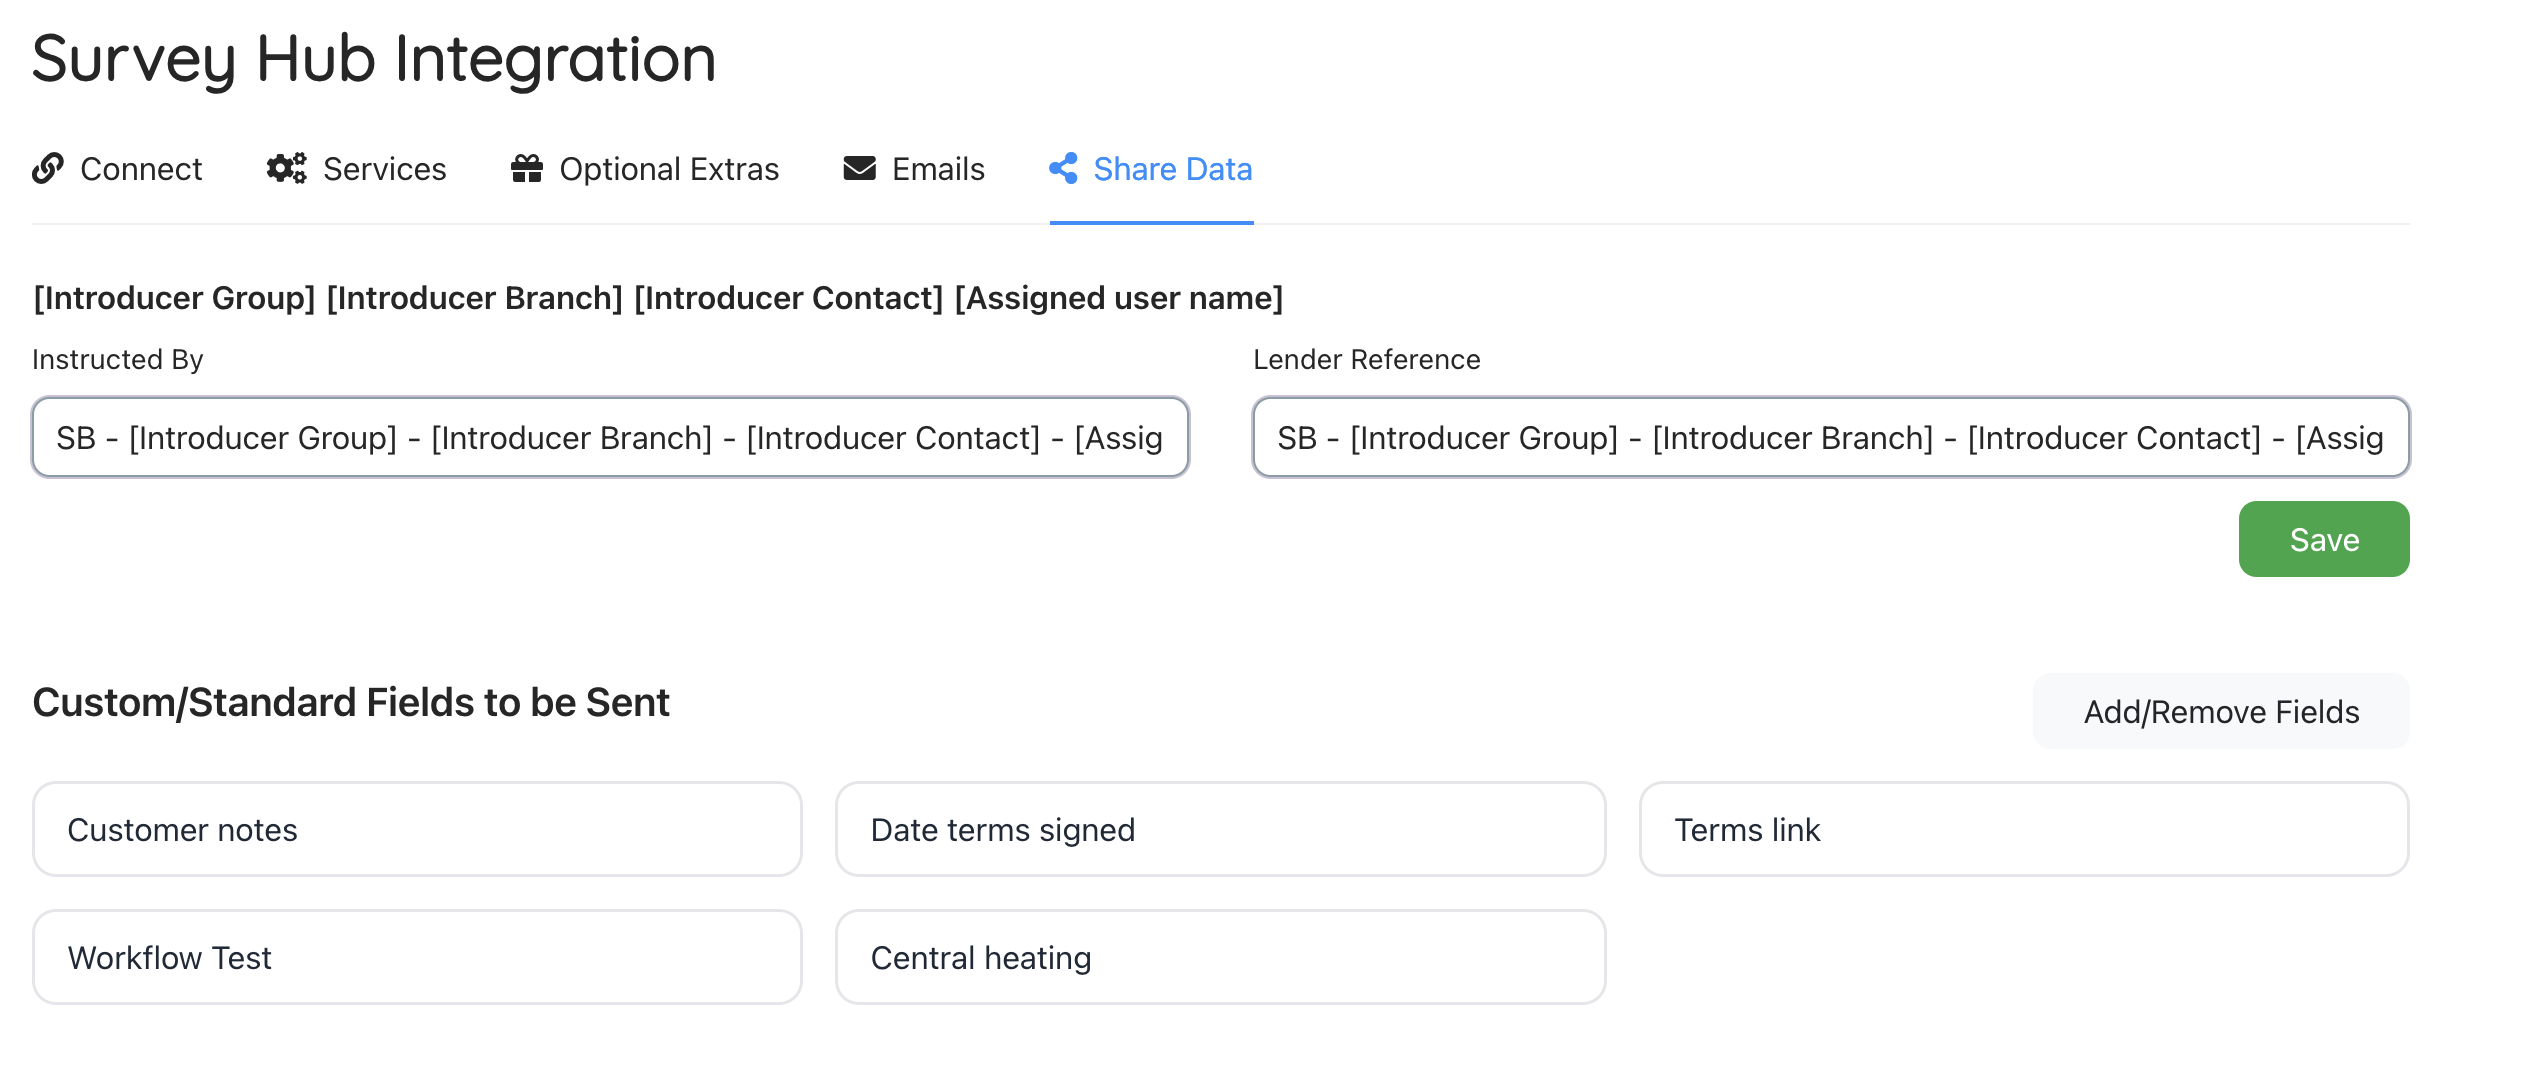
Share data tab
Here you can personalise what is sent through in the “InstructedBy” and “LenderRef” fields. The instructed by field controls what agreements need mapping in Survey Hub. There are two popular choices:
- Hardwire a value like “Survey Booker” so only one agreement needs mapping
- Add in [Introducer Group] which populates the lead source. This will be values such as ‘Direct’, ‘LSD’, ‘RICS’ etc or the referral partner group name. You can choose to also add in the branch name and contact name if you use ‘Introducer Plus’ on your account. However, we recommend adding these into the LenderRef as you can use this for reporting but won’t need to set up a large number of agreements.
Custom/Standard fields into the Booking Notes field
This field controls which fields are posted through to Survey Hub in the “Booking Notes” field.
Click on Add/Remove fields.
Select a field from the dropdown and press the + button.
Press Save.
To remove fields, open the Add/Remove fields pop up and press the trash can next to any fields you want to remove.
The dropdown will include:
- Standard fields:
- Customer notes = the additional information field
- Date terms signed = the date terms were uploaded or the terms status was manually set to Signed or Not required
- Optional extras selected = the extras selected on the job
- Terms link = the link to the signed terms document if terms have been signed
- Total quote = the total quote including extras and discounts
- Custom quote form questions
- Custom booking questions
- Post booking questions
- Custom timeline fields
- Custom property fields
How the Survey Hub feed works
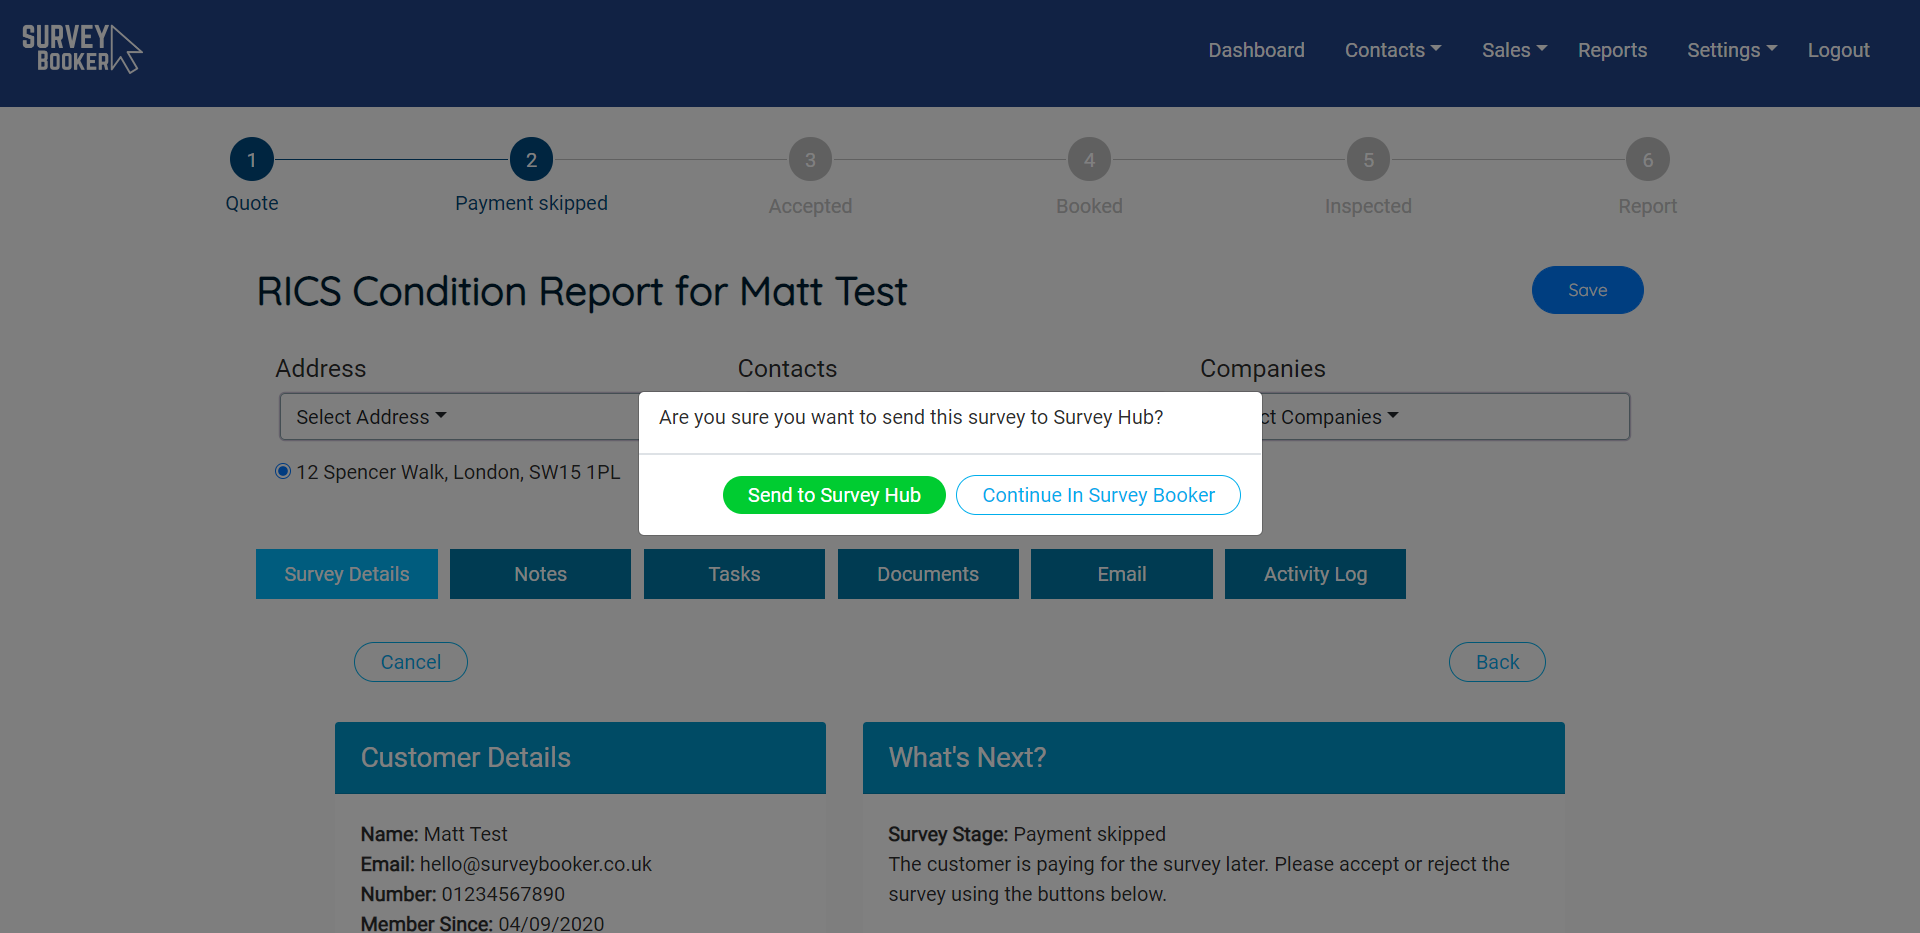
In order to send jobs to Survey Hub, press the ‘Accept’ button. If this survey has been set in your settings as a survey you would like to send to Survey Hub you will see a pop up appear.
Press ‘Send to Survey Hub’.
A hover note will appear whilst the survey is being processed. Please do not refresh or leave the page until it has finished processing the survey.
Notes
The following fields MUST be filled in for the instruction to correctly feed into Survey Hub.
- Report name: listed below the main contact’s name. This is the name used in Survey Hub for your main customer.
- Salutation: all contacts must have a salutation selected
- Access details: this is required as it determines the settings that are put in place for the main applicant. We need to know if they are also the access contact or not in order to successfully create them as a contact in Survey Hub
- Property tenure: select Freehold/Leasehold
- Property type: select a type from the dropdown
- Bedrooms: enter a number
- Terms/payment may be required based on your settings above.
You can also add a second applicant in the ‘Customer details’ section.
- Click on the “Add/Remove” button in the contacts section
- Select an existing contact or create a new one.
- The second contact will be posted as a separate contact.
What data is sent to Survey Hub
We send through the main contact, additional report contact, access contact and property details.
In the Survey Hub ‘booking notes’ field, we send through what you have set up in the “Share data” tab above under the custom/standard fields section.
Posting Optional Extras as Expenses (optional)
Once you have posted the job to Survey Hub, if your settings are set to post extras as expenses, a button will appear in the ‘what’s next’ section asking if you want to add the extras to the job in Survey Hub.
This will add successfully once the job has processed in Survey Hub and is showing in your Jobs list.
If you need to add extras to the job later in the process (e.g. the customer later decides they would like to purchase an extra), you can add these to the job in Survey Booker and after pressing ‘Update’ the button will appear so you can post the extras through.
You can only post extras once you have correctly added the extras ID number from Survey Hub into your settings. If you don’t want to post them as expenses you can ignore this and ensure that the “Settings” pop up is set to “No” for posting extras as expenses.
Troubleshooting
Job accepted, not showing in Survey Hub job list
If you have accepted the job, pressed “Send to Survey Hub” and the CoreLogic icon is colour, the post has been successfully received by Survey Hub. Check your Data factory in Survey Hub to see why it failed to process. Either some mapping hasn’t been set up or some data is in an invalid format. Once the mapping is sorted you can re-run the processing in Survey Hub. If you are unsure of how to access your data factory, please speak to your Survey Hub account manager.
Can’t accept the job
If you have already accepted the job and sent it to Survey Hub, Survey Hub will not allow us to send a post again with the same job ID. You need to accept the job and select “Continue in Survey Booker” and NOT Send to Survey Hub. The link between the two systems will already exist from the first time you accepted the job. The CoreLogic icon will already be showing in colour and the activity log will show it was previously accepted and moved back to paid. A job should only be moved back to paid and accepted again if it is stuck in your data factory, the mapping or error resolved and you can’t re-reun the process from within the data factory.
Appointment date not pulling back
For the appointment date to pull back to Survey Booker the job stage MUST show as Accepted. If it is at the stage “Paid” Survey Booker will not check for updates. The appointment date must also be in the future.
Report not pulling back
The job must be set as “Survey Complete” before the report can be pulled back. The “Report submitted” status is ignored as the report may still be a draft. The report must have been submitted via the iPad. The feed does allow us to pull back reports manually uploaded into Survey Hub.
Wrong report date calculating on confirming inspection
At 5pm on the date of the inspection, if the date is not rebooked Survey Booker can auto-confirm the inspection went ahead. We calculate the report date using the “days to report” value saved in your “Select Services” page under Settings > Select service. If no value has been set, it will default to today’s date.
Job not posting to Survey Hub and updates not pulling back
Check you have turned this job type on in your Survey Hub integration settings and that you have ticked for different stages to be automatically updated. If a job is set to inactive or stages aren’t ticked for retrieval, the system will not post the job through on accepting the job or pull back updates.
How soon do updates pull back?
We check for updates every 15 minutes. Depending on when the job status is changed in Survey Hub it can take up to 15 minutes for the update to pull back into Survey Booker. The exception is moving from booked to preparing report which is confirmed at 5pm on the inspection date as listed above.