
Activating The Survey Types You Offer
Summary
The select service page is found under Settings > Survey settings > Select service and controls which services you offer to customers.
Turning on a service
In the table are standard services listed. You can activate one of these services by pressing the “Inactive” button which will turn it to “Active”.
Alternatively, you can press “Add new service” to add your own job type to the system and then activate it.
On pressing “Inactive” a pop-up will appear asking if you want to copy the postcodes from an existing service. If you choose a service type, the postcodes associated with that service get copied in your location settings to the service you are activating. If “none” is selected, postcodes will not be copied and must be enabled manually for the new service.
The services table gives an overview of the settings for each job. Click on the pencil icon at the left of the table to edit it and adjust the settings.
Hiding a service from your quote form:
Once activated, you can press the “Active” button. A pop-up will appear asking if you’d like to deactivate the service or hide it. If you select “Hide”, the job and associated settings remain visible to you but hidden from your customer and referrer quote forms. You can still select the iob internally when adding quotes. This can be useful where you have a more detailed breakdown of valuation job types internally but keep the initial enquiry simple for your customer with a general valuation type.
Removing / Deactivating a service:
Once activated, you can press the “Active” button. A pop-up will appear asking if you’d like to deactivate the service or hide it. If you choose to deactivate the service, it will remain associated with any jobs created but:
- All associated settings are removed (welcome emails, location settings, pricing etc)
- You will face errors updating any live jobs associated with the service as there will be no associated email templates causing automation errors.
Job tabs:
There are 3 tabs:
- Active – any jobs types you have activated
- Hidden – any job types that are active but hidden from your quote form
- All services – all services – active, hidden and inactive
Other settings you need to update for activated services
After turning on a service you need to add in related settings such as:
- Pricing
- Locations
- User settings (regional and custom users)
- Integrations settings – lead gen feeds, report writing connections etc.
- Terms settings – adding this job to an existing template or setting up new ones
- Optional extra settings – set which extras are applicable for this service
- Welcome email/SMS templates – these will use a ‘vanilla’ base template. We strongly recommend you update this with your USPs, when you’ll be in touch with a quote and more to support lead conversion. The base template is not recommended.
General settings
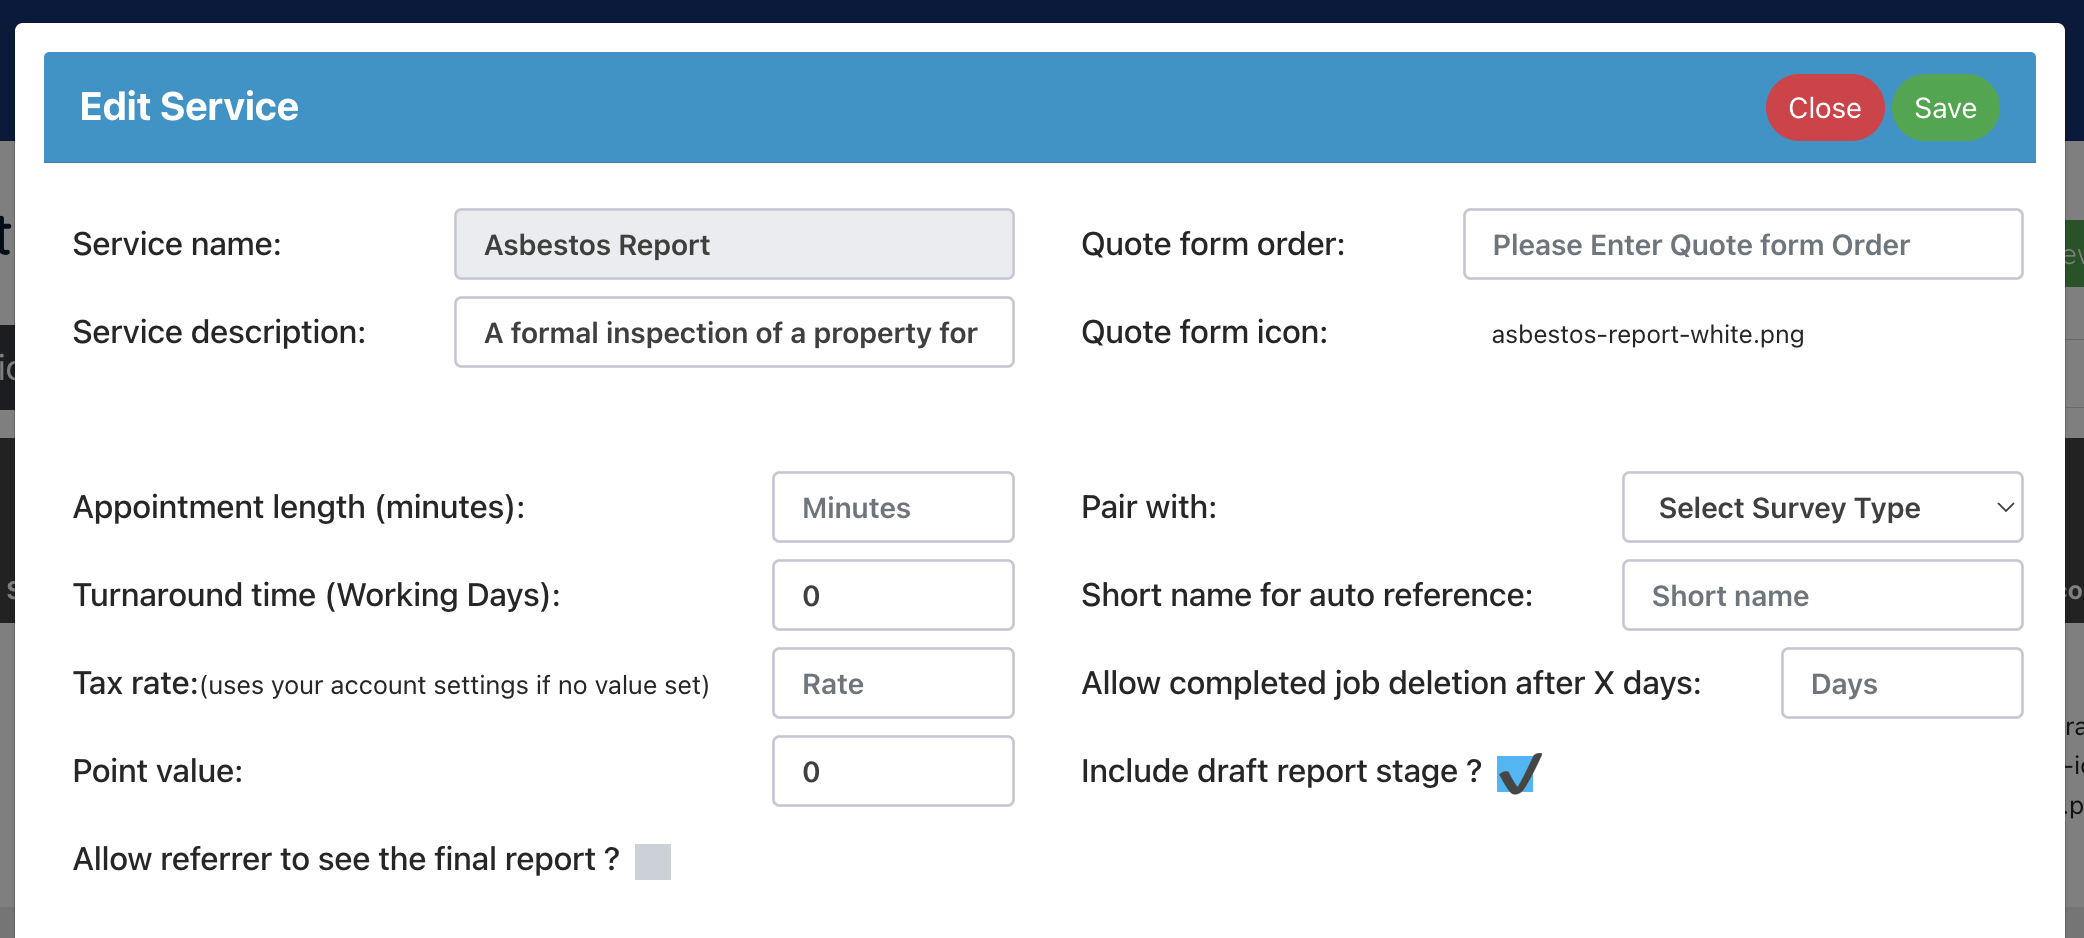
The pop-up controls the following fields:
Service name – name of the service. Editable if the job is a service you created. Not editable on standard system jobs.
Service description – the description that appears on your quote form when hovering over the service icon.
Quote form order – the order the services appear on your quote form (this is overridden by the Customer Portal settings if you have the custom quote form feature active).
Quote form icon – click on the icon name to upload your own icon or change the icon you previously uploaded.
Appointment length – sets how long the appointment is in your calendar.
Turnaround times – provides a suggestion of the report due date when confirming the appointment went ahead. For Survey Hub users, we use this to calculate the report due date when confirming the appointment went ahead.
Tax rate – when calculating tax on the job we use the default rate set in your account settings. If this job is subject to a different tax rate to your normal rate, you can set a different tax rate here.
Point value – if you want to see how many points each user has generated, this is included in the report page export.
Pair with – this works with the [Pair Survey Text] email shortcode that enables you to provide the price of the paired survey in your welcome email for that paired job type. See the following guide for more information: https://support.surveybooker.co.uk/my-support/provide-your-quote-for-another-survey-type-in-welcome-emails/
Short name for auto reference – this sets a value you can use as part of a custom reference number (set under Settings > Survey settings > Quote preference).
Allow completed job deletion after X days – this allows you to set the number of days that a job cannot be deleted for. When you select a job from your quotes/jobs table and try to delete it an alert will come up saying you are not able to unless the job record is older than the age set.
Include a tentative appointment step – if activated, when booking an appointment, the job will move to ‘Tentatively booked’ allowing you to confirm the final appointment date/time later.
Draft stage – if activated, when uploading a report, the job will move to ‘In review’ allowing you to review the document before marking the job as complete and submitting the report.
Allow referrer to see the final report – applicable only to multi-document jobs, it allows the referrer to see the final report once completed if this is ticked.
This job doesn’t need terms signed? – if ticked, when a new quote is created, the terms status will automatically be set to “Not required”.
Show conflict of interest? – if ticked, the “Conflict of Interest” section will be displayed on any new quote records created.
Lock survey on completion? – if ticked, when a job reaches completion, the job will automatically lock. It can be manually locked if this feature is not used.
Allow shareable report page? – on completion enables a shareable report link to be displayed on your job record / sent in the job completed email to your partners. This form enables a report to downloaded publicly with details of the users downloading the report captured.
Multi-document reports
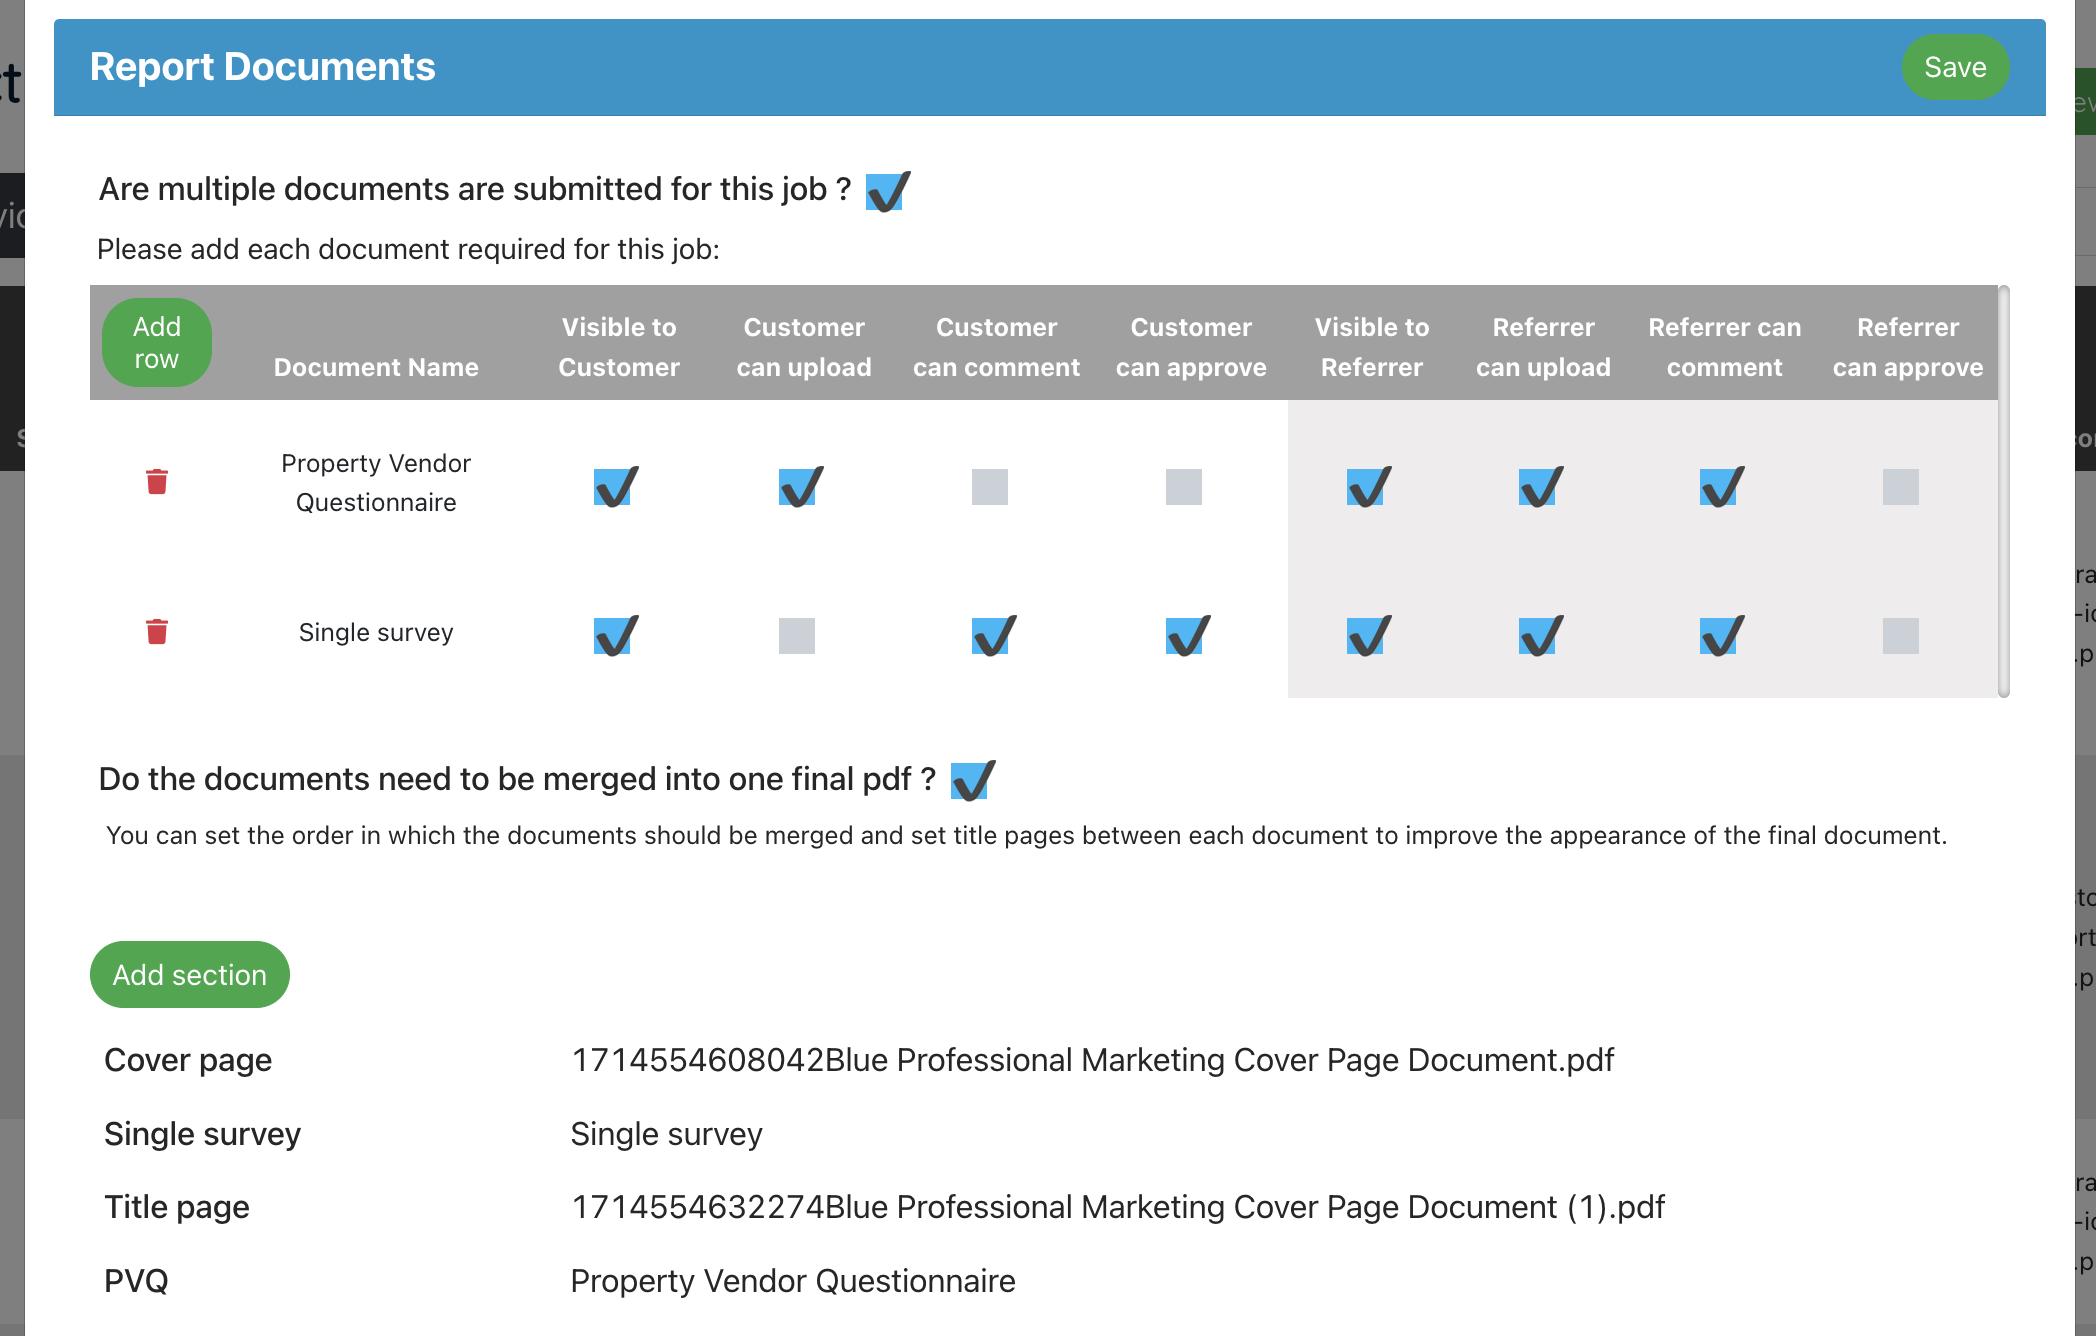
This allows you to set that the job is made up of multiple documents that can each be uploaded individually. Once ticked, you can then add in more document rows.
- Press “Add document”
- Enter the document name
- Tick if the customer should be able to view, upload, comment or approve
- Tick if the referrer should be able to view, upload, comment or approve (Note: approve is currently in development on the referrer side)
- If all documents are unticked for the customer/referrer, they remain internal only.
Merge
If the various job documents should be merged on completion, tick this box.
You can then set the order in which the documents should merge. You can also set that there should be standard title pages between different documents if applicable by selecting the option to upload a standard document.
Note: all documents should be uploaded as pdfs to allow the merge.
Job sheets
This feature allows you to automatically populate job data into a document template. The most common use is to create a job sheet, but this could be any document you need to produce whether that be prefilling data into a report template, a job sheet, an invoice template or more.
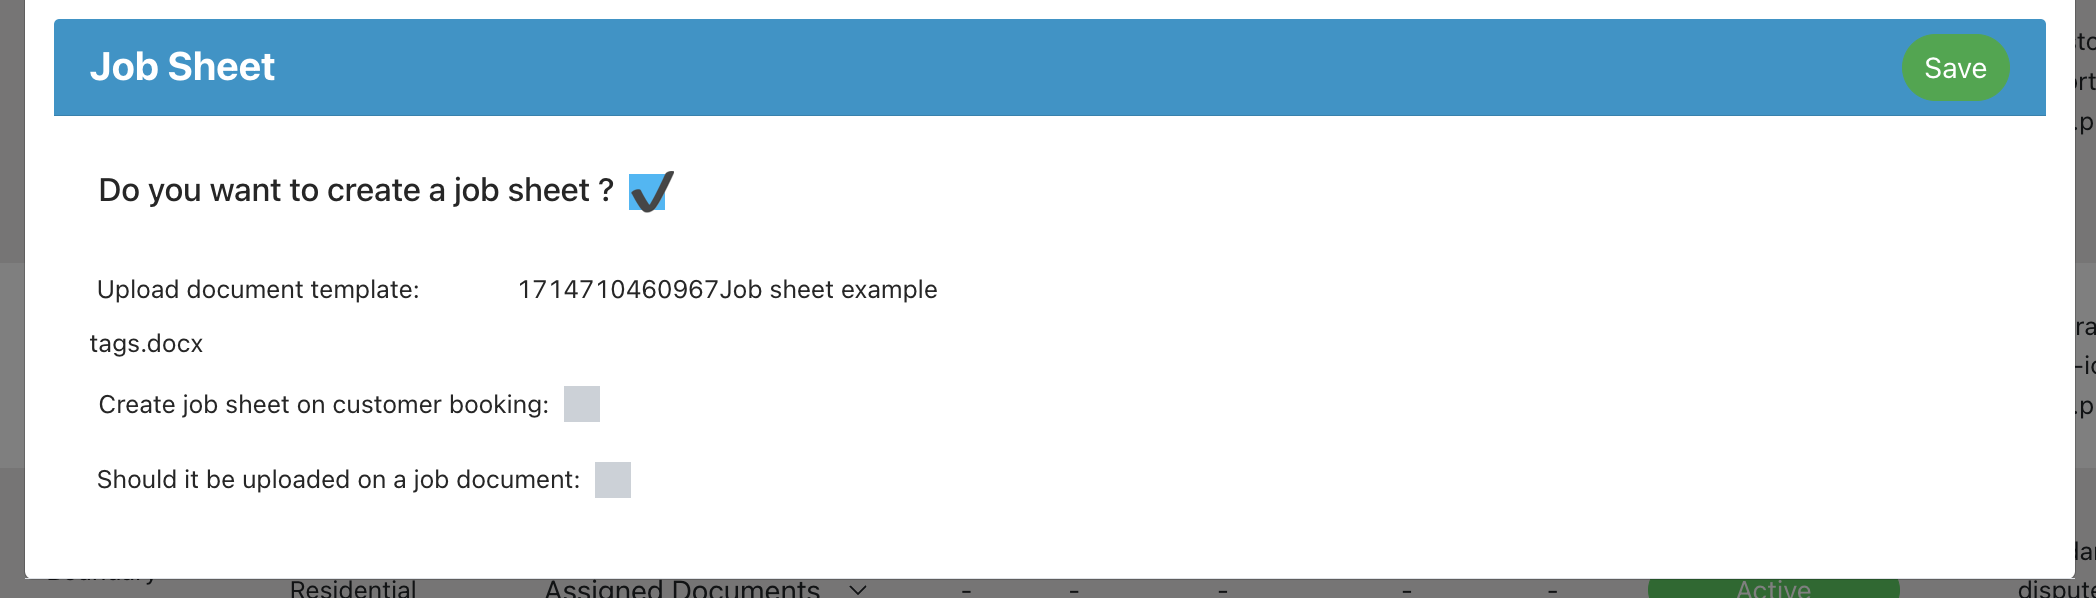
After ticking to include a job sheet, upload your document template in Word format.
See our job sheet guide on how to set up the template with tags to populate data.
You can then set if the document should be created automatically on customer booking if not. If this is ticked, or not ticked, you can manually generate the job document at any time.
You can also set if on being generated, the job sheet should upload onto a job document or not (if you’ve set up multi-document fields in the step above).