

A guide to your customer portal settings
Navigate to Settings > Customer portal settings.
The customer portal settings are broken down into a number of tabs. The features you see will depend on the features active on your plan. The following tabs provide various settings:
- Quote form – this provides settings related to your quote form and quote result pages
- Account pages – this provides settings related to your customer booking and tracking pages
- Styling – the customer portal styling settings (colour settings and more)
- Other settings – other settings that affect what the customer see’s in their account
Quote form tab
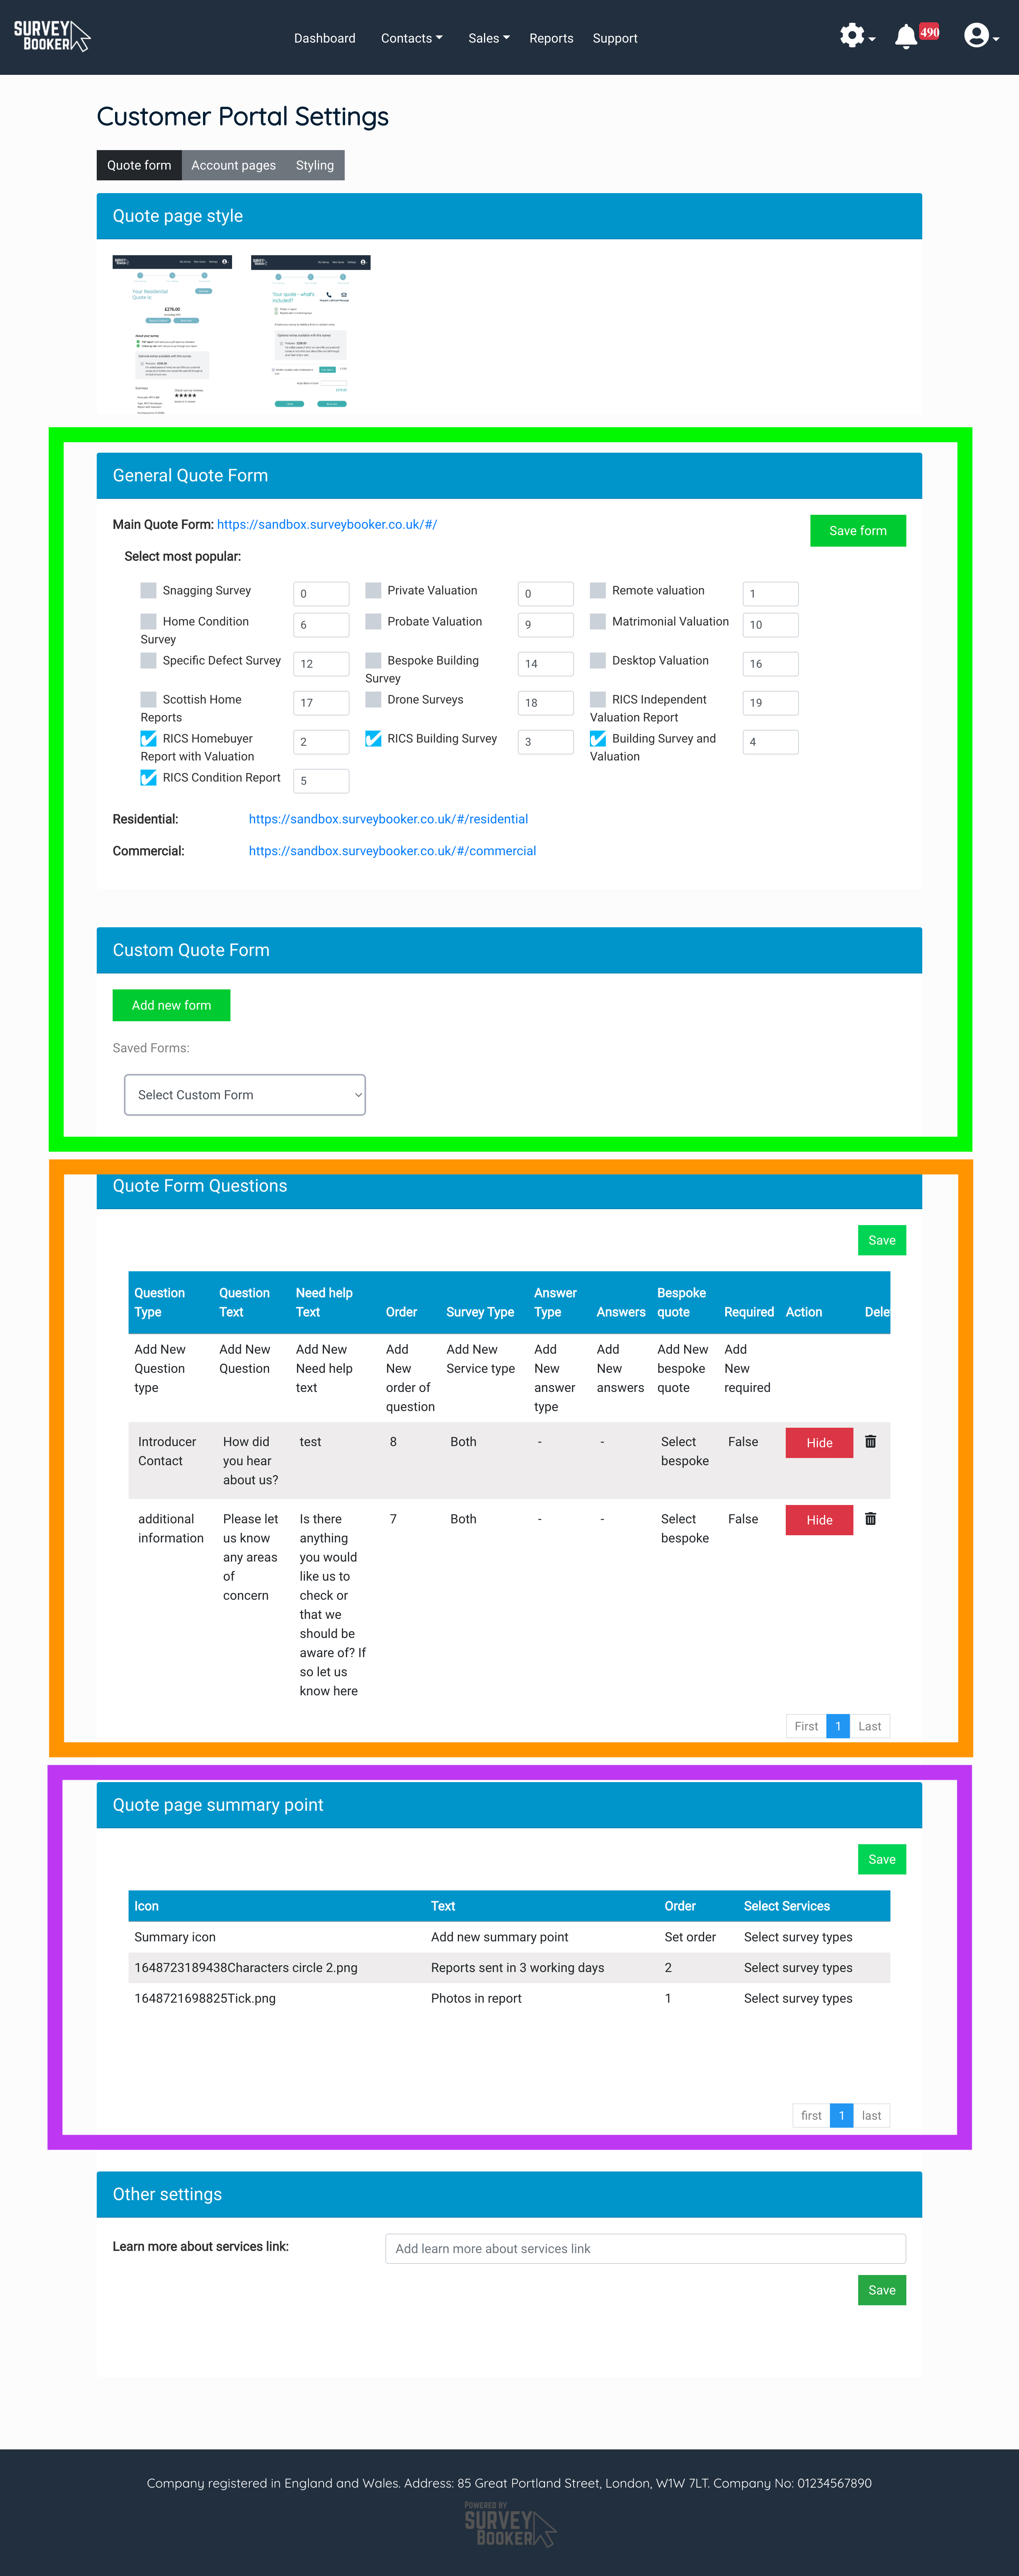
Your quote form tab is broken down into the settings related to your quote form and quote result page.
Quote page style
This displays a list of layout options available on your plan. Select the layout you wish to use and press “Save”.
General Quote Form / Custom Quote Form
If you have the “Custom quote form” feature on your account these settings are controlled here.
General quote form – this section controls the services that appear as buttons on your quote form with the rest appearing in a list. You can tick up to 10 services that should appear as a button and set the order they appear in by typing a number into the box next to the service. Press “save” to save your changes.
Custom quote form – this section allows you to set up multiple quote forms with only selected services listed on there. Select an existing form to edit or press “Add new form”. Enter a name for the form which will form your URL for it. Tick the services that should appear on this quote form. If the form has 10 or fewer services they will appear as buttons. If you have 11 or more services selected they will appear as a list.
Quote form questions
This section is visible if you have the Quote Form Personalisation feature activated. This section allows you to:
- Edit the question text and question help text
- Edit which questions appear or are hidden
- Add custom questions with custom answers
- These questions will appear on your quote form and the answers will display on your property details section of your job timeline
Quote page summary points
These points display if you have the Quote Form Personalisation feature active. Here you can set custom points that appear on your quote result page to advise customers on what features are part of your service.
You can set as many points as you need and set which services each point should appear for.
Upload your preferred icon for that point, set the description text, set the order and the service types the point should appear for.
Other settings
This section enables you do add a link to your website that describes more about your services. When a link has been added here, a “Learn more” link appears on your quote form that takes customers back to your set link so they can research more about your services before continuing with their quote.
Add your link and press the “Save” button.
Customer account settings
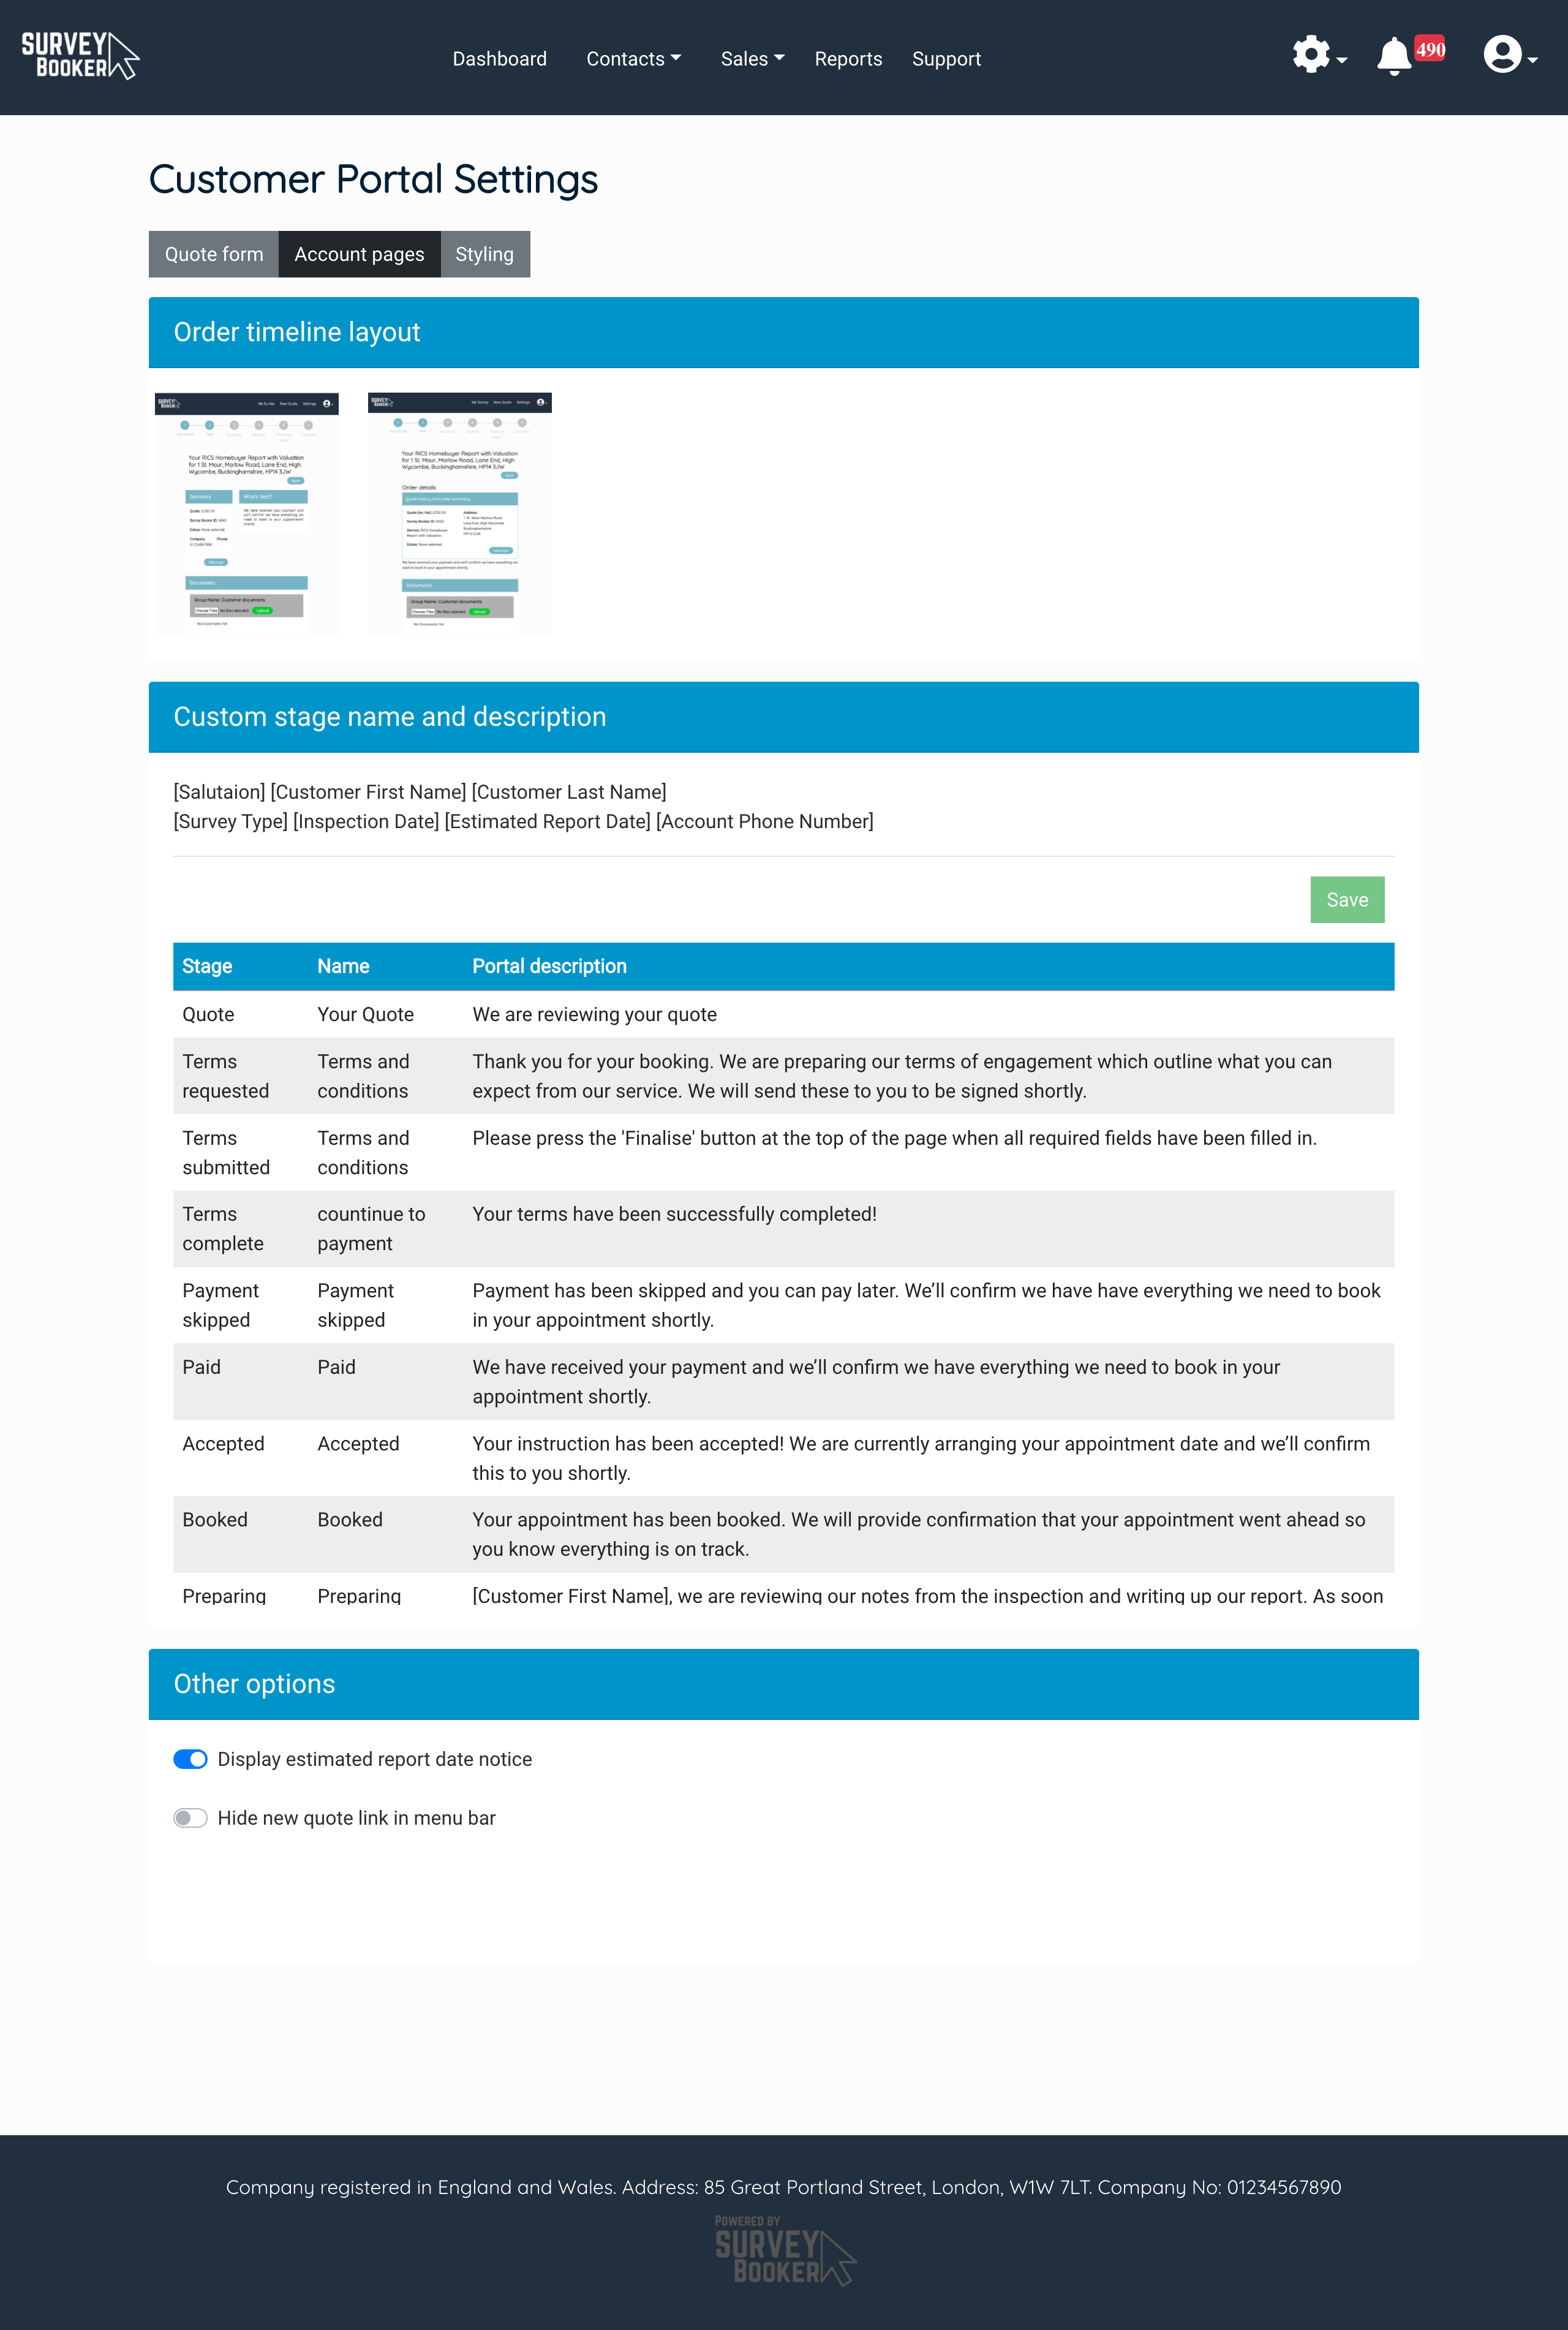
Order Timeline Layout
Here you can select the template that your timeline page uses depending on the templates available on your plan.
Custom stage name and description
If you have the custom customer portal feature available on your account you will be able to personalise the stage names and the summary text that displays at each stage of your customers survey. You can add the [Shortcodes] into the descriptions to personalise your stage descriptions further (e.g. “Good news, [Customer First Name]! Your report is now ready to view. Click on the button below to view your report”.
Note: edit one row at a time and press the “Save” button before editing the next row.
Other options
Here you can set if the customer see’s the “Estimated Report Date” banner in their customer account. If you don’t want customers to see this, set the slider switch to the off position (grey is off, blue is on) and press “Save” and the report date banner will no longer appear.
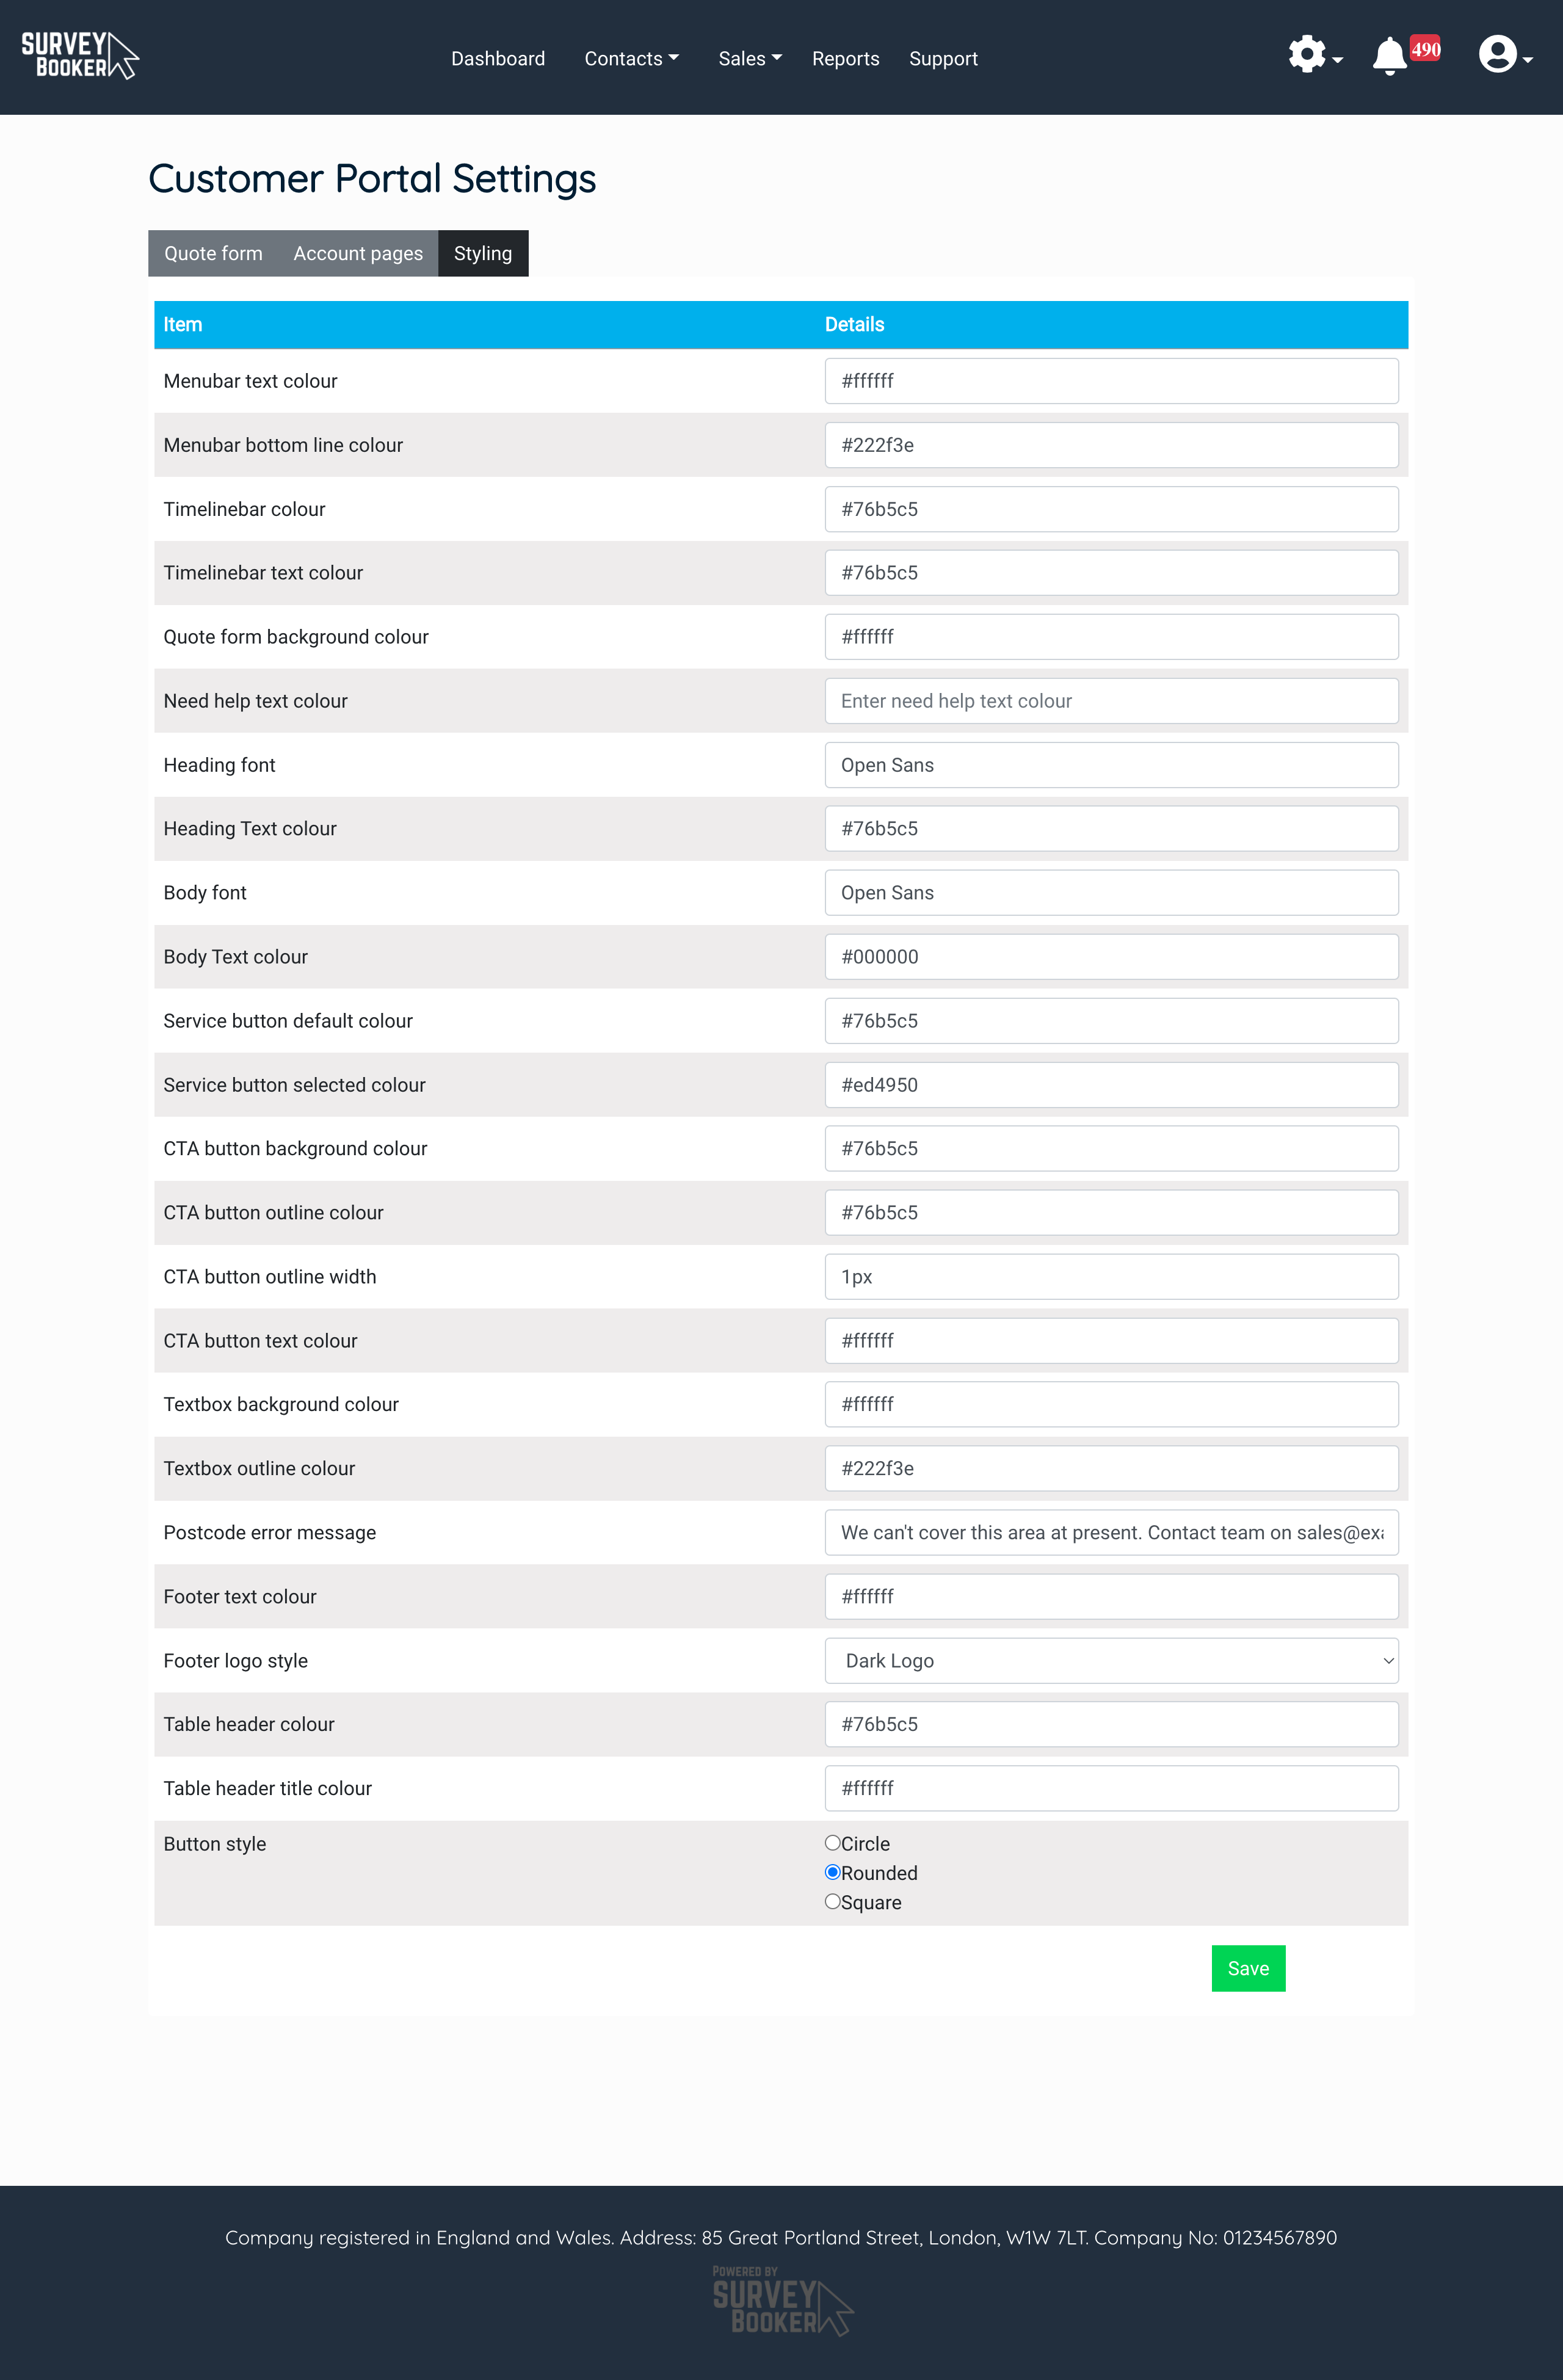
Customer portal styling tab
For all accounts the the general styling is visible:
- Logo upload – add your own logo here.
- Logo height – set the logo height. It must have ‘px’ at the end (short for the size in pixels). E.g. “325px”
- Logo width – set the logo width. It must have ‘px’ at the end (short for the size in pixels). E.g. “325px”. To keep the logo proportions you’ll need to set your height and width in the same proportions as the original image.
- Menubar background colour – set your brand colours for the menu bar colour so your customer portal branding can match your brand guidelines.
- Footer Colour – set your brand colours for the footer bar colour so your customer portal branding can match your brand guidelines.
- Footer text – set custom text with your company registration details.
If you have the Quote Form Personalisation feature, this tab enables you to personalise your branding to closer match your quote forms and customer portal styling to your own company brand guidelines.
Here you can edit the colour of the page, buttons, text areas, section headers and more. You can set fonts for your heading a body text by entering the name of any Google font. You can find Google font names by clicking here where over 1040 font families are available. If your font doesn’t update automatically after setting the name, please contact the support team.
After entering all your changes, click save at the bottom of the page and refresh the page to see your changes.
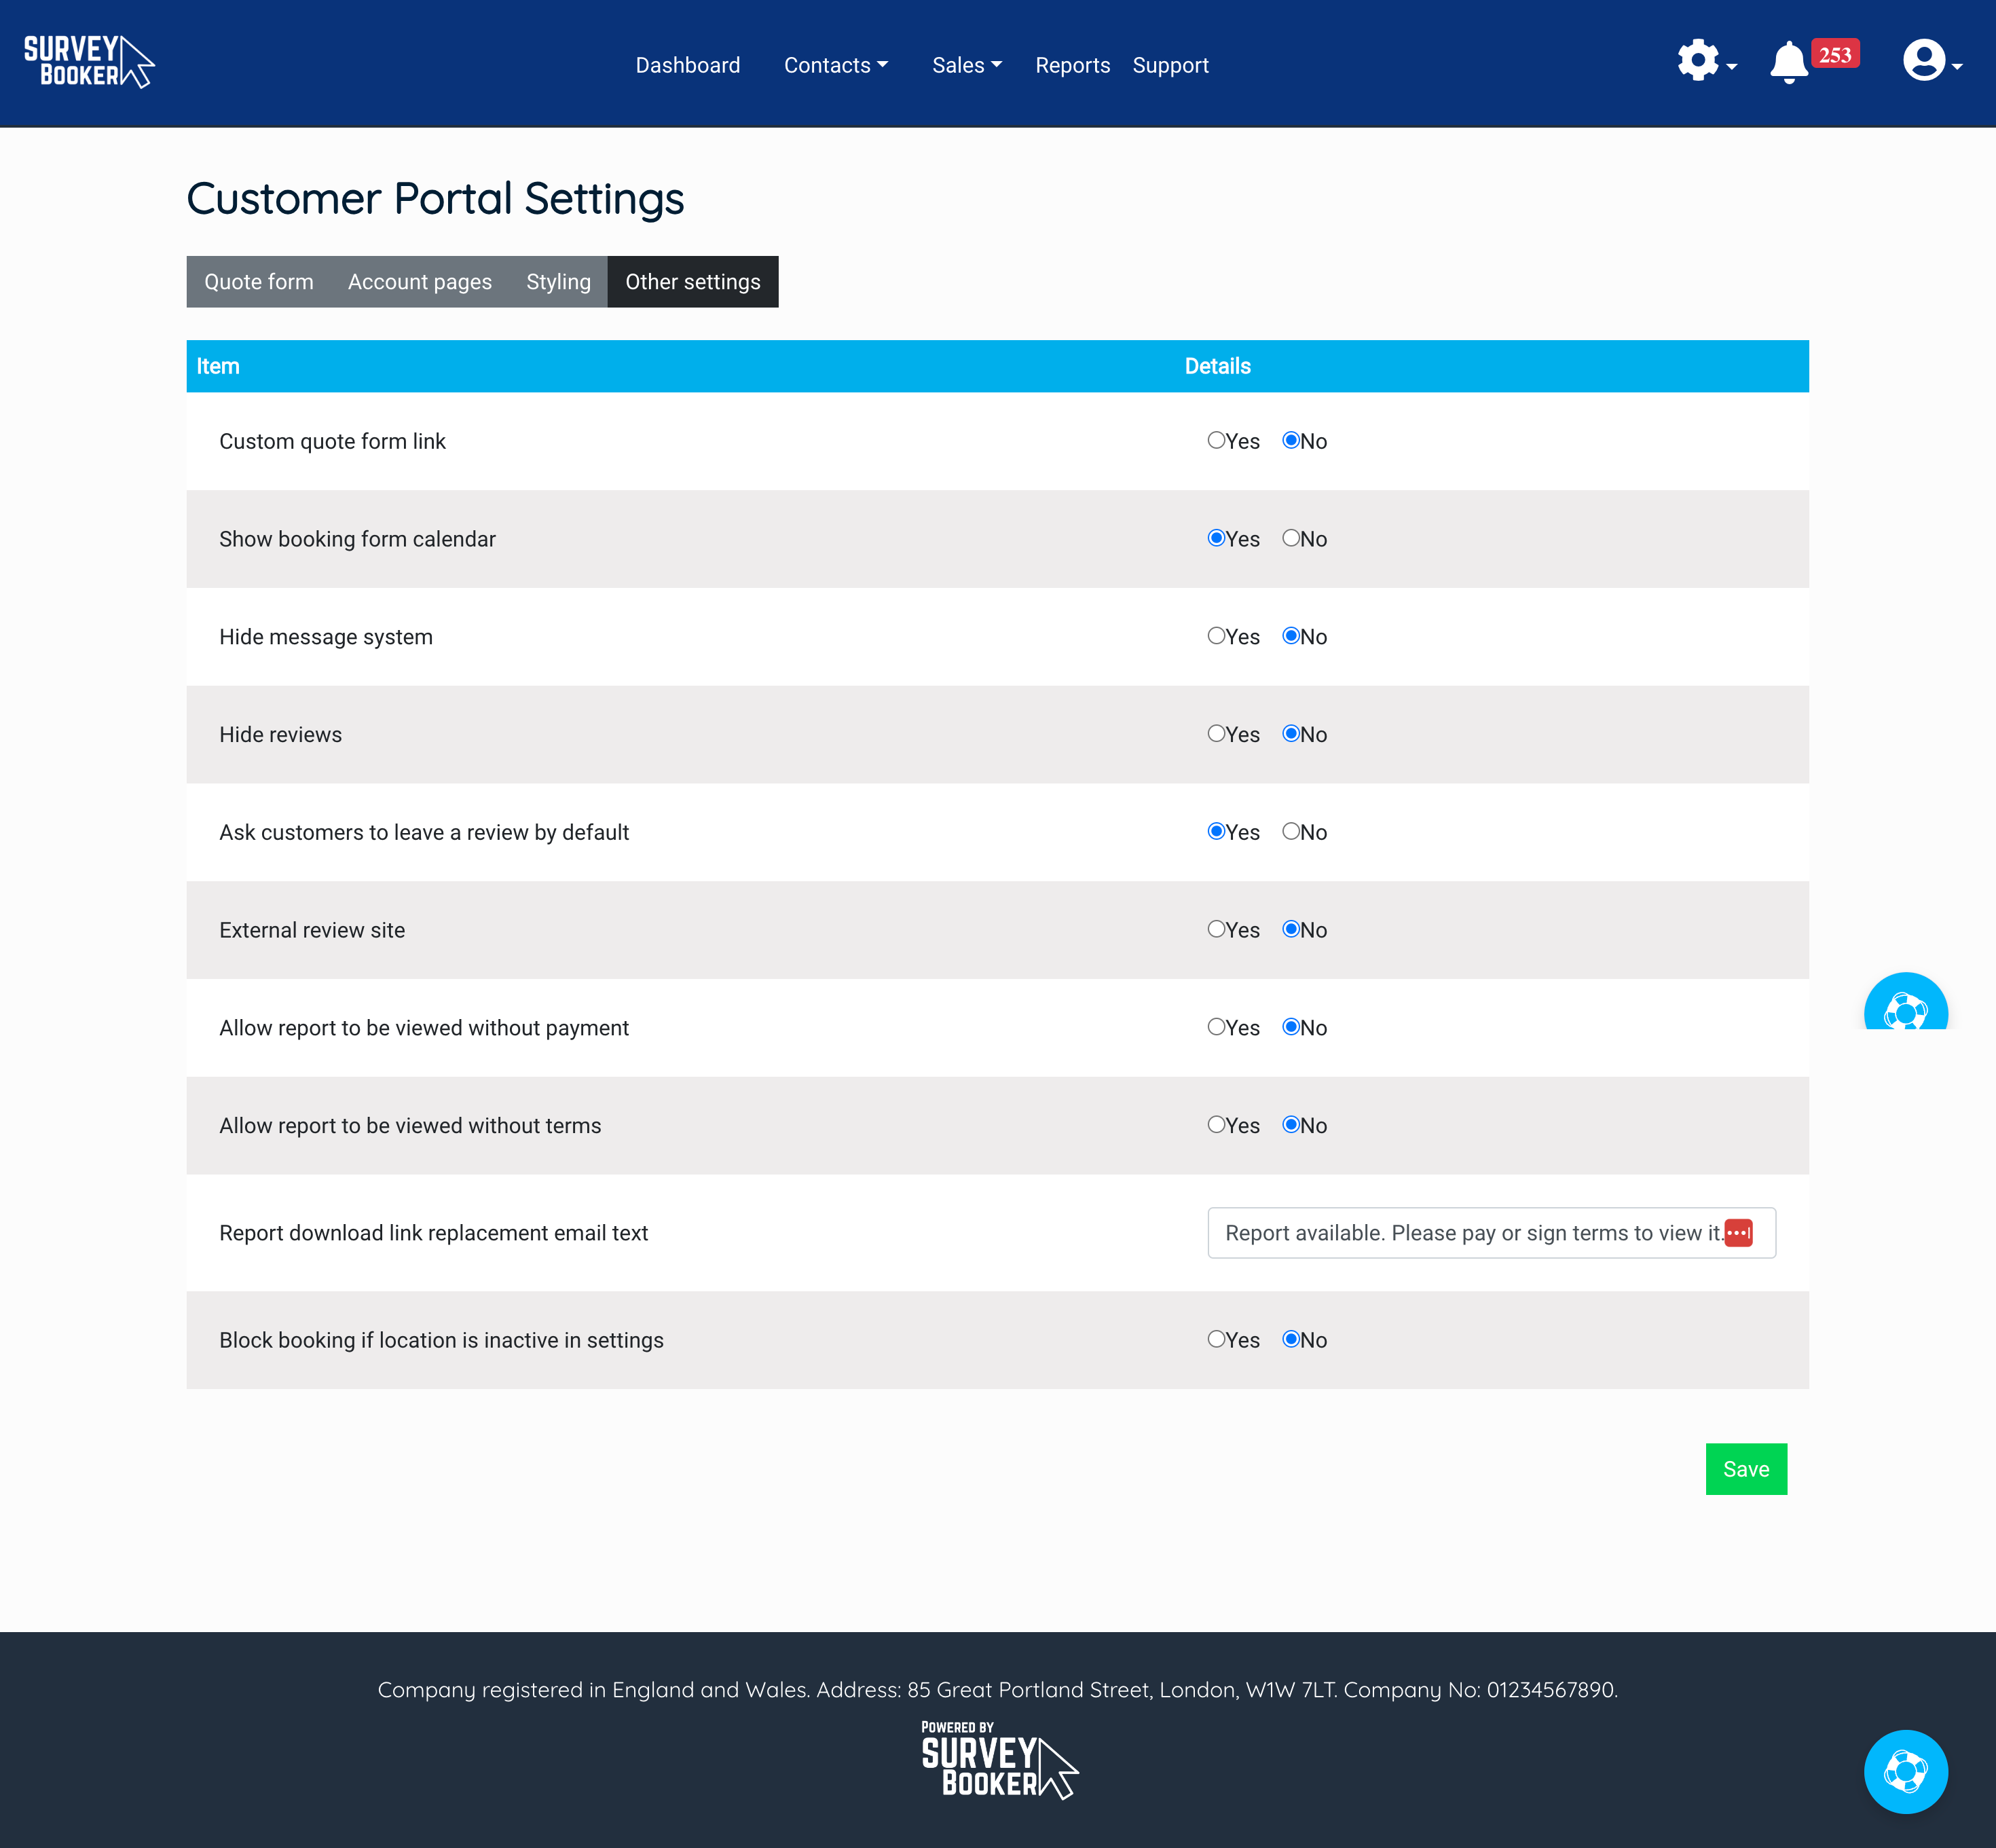
Customer portal other settings tab
This tab provides additional settings that can be used to personalise what the customer see’s in their account.
- Custom quote form link – this changes the “new quote” link in the customer portal to a custom link instead of our quote form
- Show booking form calendar – this shows or hides the field during booking that asks a customer what their preferred latest date is for the report
- Hide message system – this can be used to hide the message system button in the customer portal
- Hide reviews – this can be used to hide the review stars from the quote result page
- Ask customers to leave a review by default – this sets if the submit review button is visible to customers by default. If set to “No” you’ll see an “allow review” button on your job timeline. Press this to allow customers to submit a review.
- External review site – this allows you link the review stars on the quote form to an external review page and the submit review button once a job is completed to your leave review page.
- Allow report to be viewed without payment – this allows you to block the report download link from being visible in the customer portal and report available email if payment is missing. Once added, press ‘resend email’ in the email logs to resend the report available email with the link available.
- Allow report to be viewed without terms – this allows you to block the report download link from being visible in the customer portal and report available email if terms are missing. Once added, press ‘resend email’ in the email logs to resend the report available email with the link available.
- Report download link replacement email text – when you use the report blocks above, this text appears on the customer portal and in the report available email in place of the report download link to advise the customer what they need to do.
- Block booking if location is inactive in settings – this sets if a customer is allowed to book a job on a quote they have if you no longer cover that location in your settings. If set to “No” a customer can still book on a quote you provided if you’ve set that you no longer cover that location.