

Add referral partners to your account, update settings and view referrals made
You can add referral partner accounts to your account to make it easy for referral partners to send you leads. Each referrer is given an account where they can track the status of every customer they refer to you. They are provided with a unique quote form. This tags the customer search to that referral partner so you can track which customers can from which referrers and your referrers can track the status of any referrals without needing to get in touch.
You can set referral fees that are added to your regular quote or choose not to add any fee. Your quote is made up of your base fee and bedroom fee from your pricing tables and a referral partner fee set for the relevant survey type for that referral partner.
Adding a new referral partner
On your referral partners table, click on the Add referral partner button.
This will take you to a new page. Fill in the details – required fields are noted by an astrix *
As a super admin, you can set which fields are required and which ones aren’t. This is set under the settings tab (see below).
Note: to add an referral partner you must have already created a settings group that you can assign to the referral partner you are adding. The section below will talk you through this. On saving you’ll be redirected to the new referral partner record.
Standard referral partner features: each record is added at group level.
Additional referral partner features: you can set if a new record added is group level, a branch at a group or a contact at a branch.
Adding referral partner settings
On the settings tab you can create one or multiple settings groups. This allows you to update settings and fees for multiple firms in one go.
When you create or edit an referral partner you can set which settings group they belong to.
Create a new settings group
- Click on add group
- Fill in the answers to each question and set referral fees.
Edit an existing settings group
- Use the dropdown to select an existing group and edit the settings.
- You can also delete a group once you’ve opened it.
What do each of the referral partner settings mean?
Referral partner account settings
- Hide referral partner fee in referral partner account
- This sets if the referral fee field is visible on the job record in the referral partner account.
- Hide total quote and total paid?
- This sets if your quote and amount paid by the customer are visible on the job record in the referral partner account.
- Display customer quote form link?
- This sets if the quote form link and submit referral button displays or is hidden from the referral partner account.
- Display referral partner referral form link?
- This sets if the basic referral form link displays or is hidden from the referral partner account.
Customer settings
- Ask which contact referred customer? (referral partner plus)
- Select “yes” to display a list of contacts on the referral partner quote form.
- Select “no” to hide the how did you hear about us question and hide the list of contacts.
- Hide report name field?
- On the customer details page of the quote form, a field can be displayed allowing a different report name to be set to the main contact name.
- This is useful where a different person is to sign terms to the name that should be on the report.
- Allow instant customer booking (auto terms)? (referral partner plus)
- If your account allows automatically produced terms, you can prevent terms being produced automatically for customers via this referral partner.
- This is useful where a different terms document is needed for bookings via this referral partner versus your direct searches.
- Hide new quote link?
- In the customer account is a link in the menu bar allowing the customer to view your quote form and search for a new quote.
- Set this to “yes” to hide the new quote link and stop customers from being able to view your quote form.
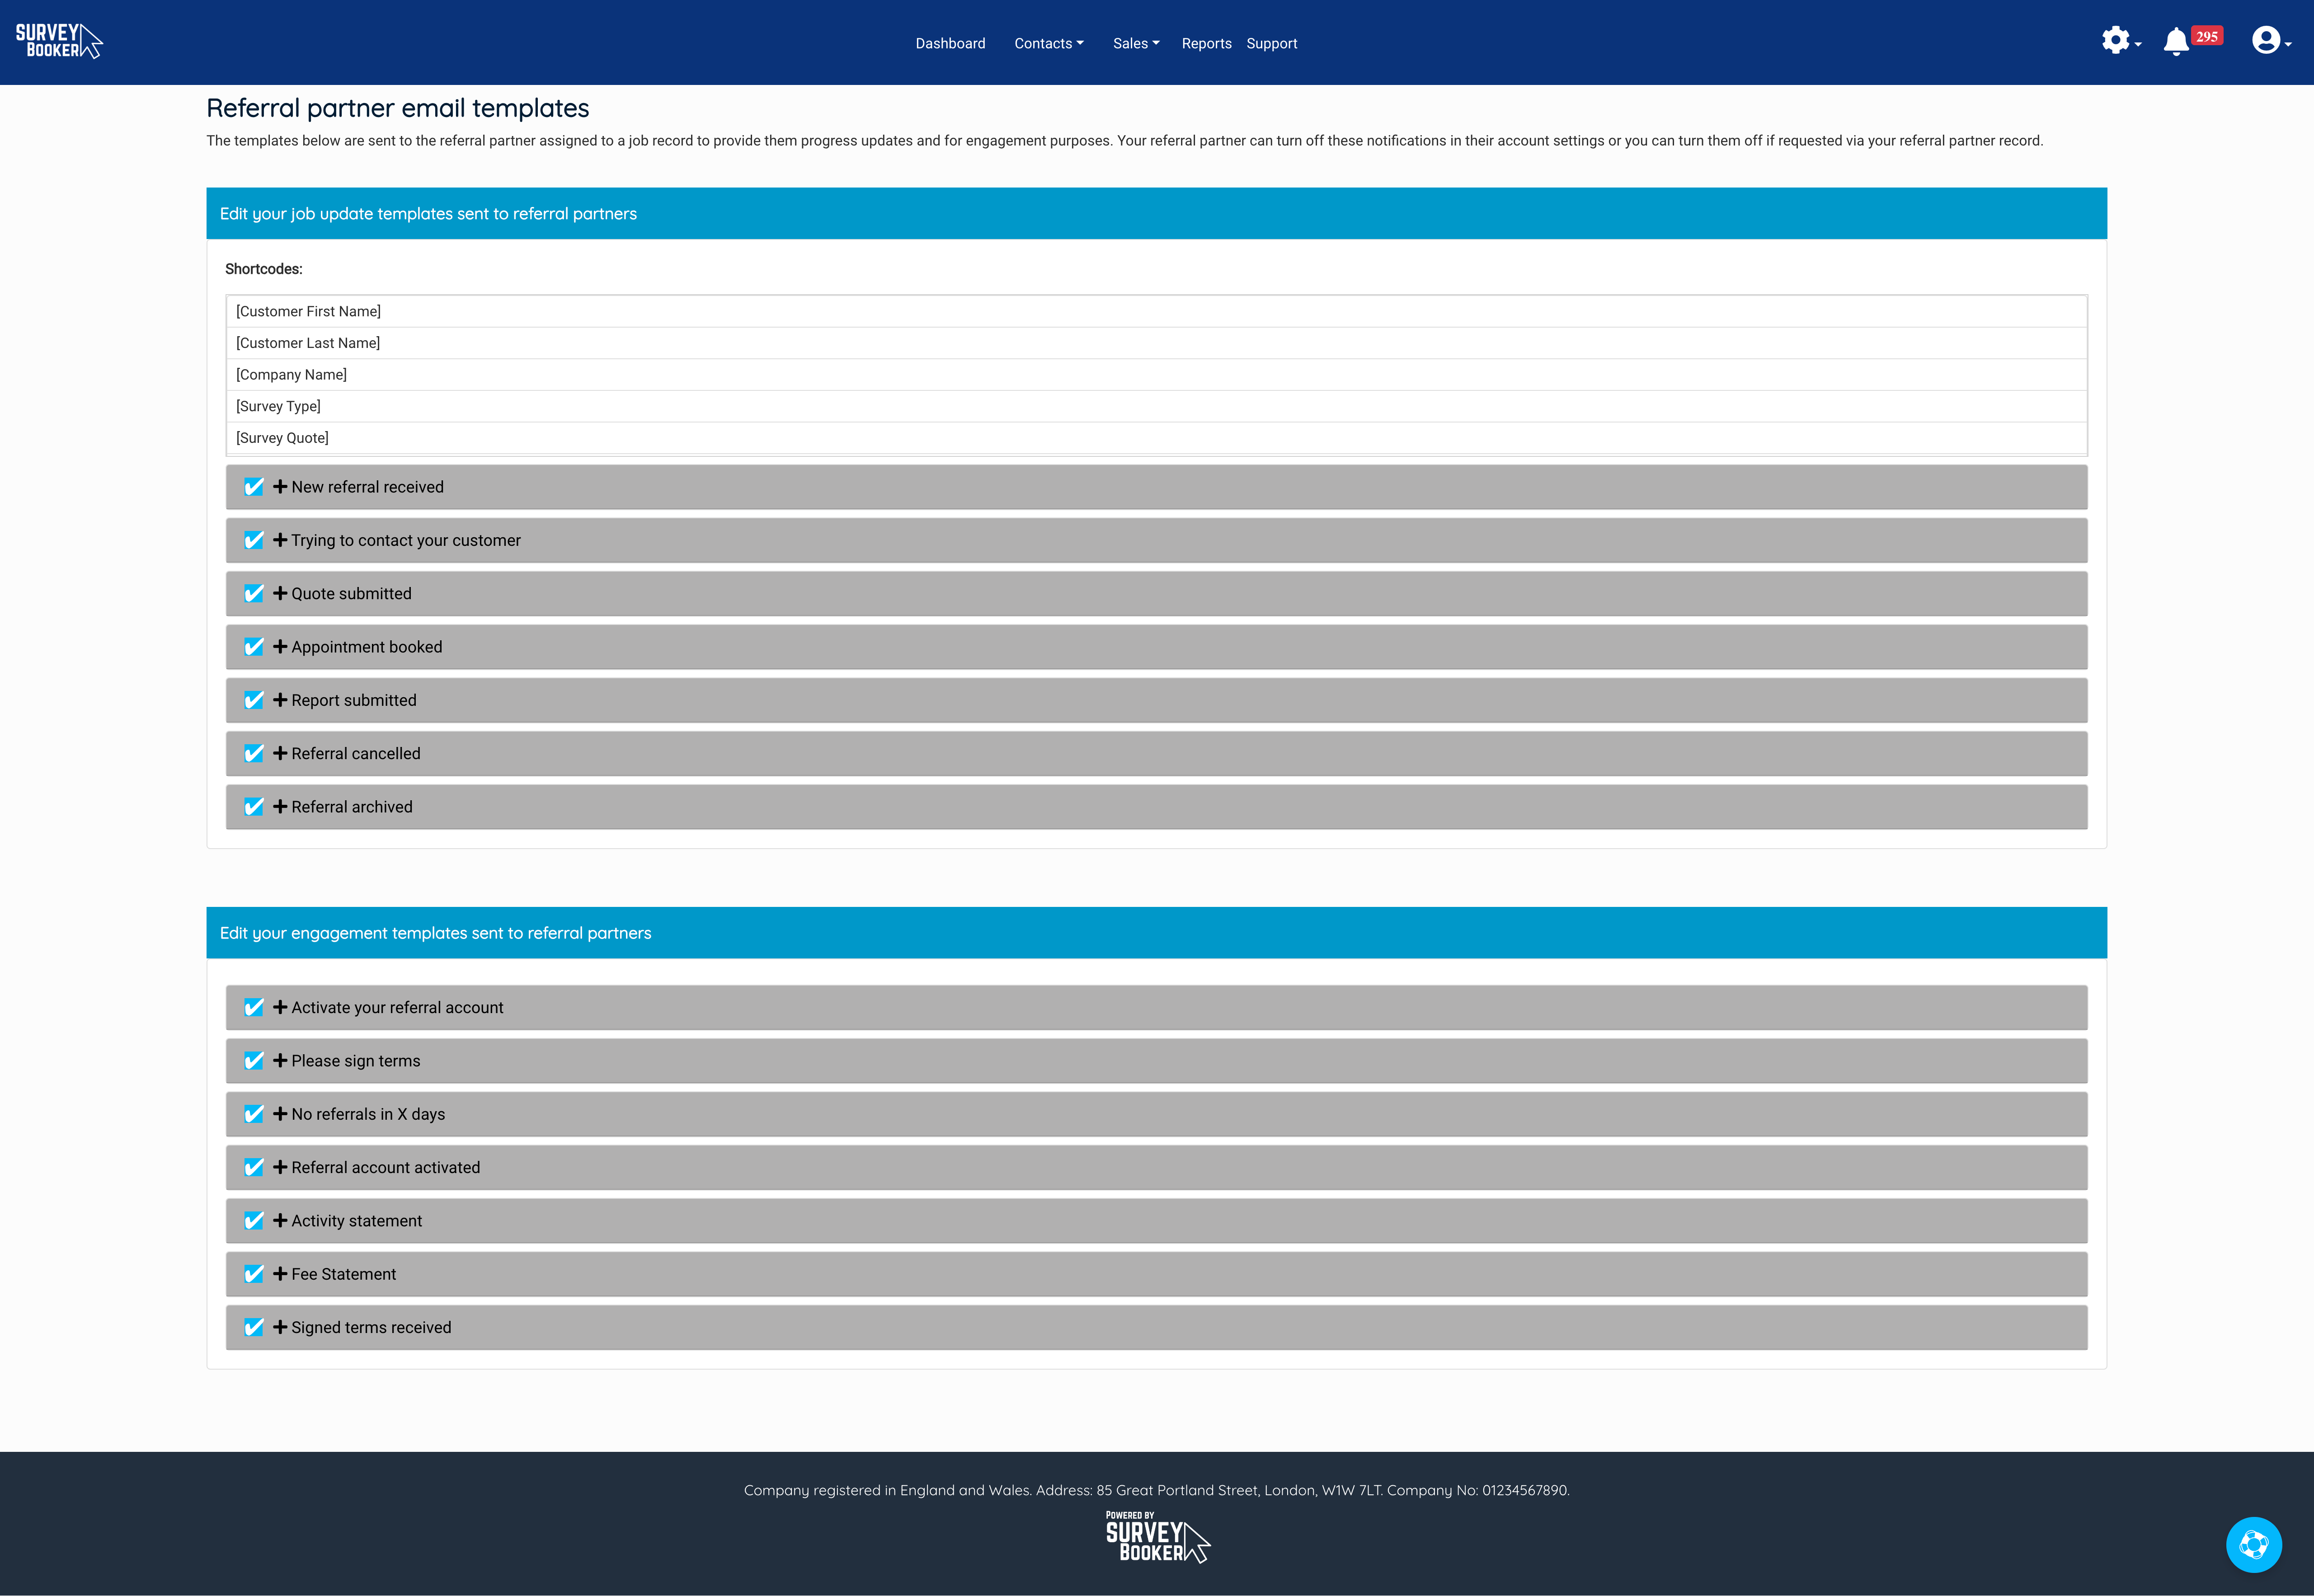
Customer job updates
Under this section you can set which customer job emails are sent to a customer if the lead is assigned to a referral partner in this settings group. This allows you to prevent some emails from being sent where it’s important some emails aren’t sent out.
For example, if you get leads from a panel and you don’t want welcome emails or payment required emails sending you can set these not to be sent out.
Note: if you tick an email template should send to a customer, the template must be turned on in your email templates settings. The email template settings override other settings and if turned off there, an email won’t be sent.

Referral Fees & Service Level Agreements
- Add referral fee to quote?
- This setting allows you to set if any referral fees set in the tables at the bottom of the page should add on top of your direct quote or not.
- Select “yes” to add the referral fee on top of your normal fee
- Select “no” if the fee shouldn’t be added to the quote. The fee owed will still display on your job record.
- Custom fee scale (referral partner plus)
- This enables you to set a custom fee for customers received from this referrer.
- For example, if you have agreed a cheaper rate with a particular referrer, you can set a special fee scale for this referral partner compared to searches made by direct customers.
- Payment preference
- This enables you to set which level you collect payment details for group, group and branch or group, branch and contact depending on who you pay referral fees directly to. For example, if you pay all referral fees to the group and they share payments out later, you can select “group”. If you pay branches and contacts directly, you can collect their payment preferences separately.
- On the job record you can then select bank payments, vouchers or other.
Statements and Emails (referral partner plus only)
Statements: these settings allow you to set which referral partner levels can view statements (e.g. groups only, all levels etc). You can also set if the statements are displayed and emailed out weekly or monthly depending on the frequency with which you’d like to share updates.
Emails: here you can set if job updates sent to referral partners should be sent just to the assigned referrer level (e.g. only email the contact if the lead came in at contact level) or if the job update should also send to the levels above (e.g. also email the branch and group level emails to let them know the lead referred has progressed).
Referral fees table
These should be set even if you do not offer fees. If you don’t offer a referral fee set each fee and fee cap value as 0. You must set a referral fee even if the value is ‘0’ so we can still calculate an instant quote otherwise it will save as bespoke.
Type of fee
You can set your fee by £ or %. Click on the % button next to the survey type and it will change to a £ sign. Click again and it will change back to a percentage.
You may wish to offer a % fee but cap it. For example you may wish to set a fee of 10% but cap it at £50. You can do this by setting the fee cap. If you don’t want to cap the fee then please set a high fee cap (e.g. 10,000)
When setting a £ amount please enter the fee in both the £ field and the fee cap field.
Email settings
There are two types of emails you can send to referral partners:
Engagement emails
These are sent to referral partners to help you increase engagement with referring business to you. By helping them see what is going on with any leads sent through, this will help increase transparency and encourage further referrals.
-
Scheduled emails
- Activity statements: this email can be set to send weekly or monthly to group, branch and/or contact level depending on your referrer settings. It prompts referrers to login to download a statement. To view the statement content, click here.
- Weekly statements scheduled to send on Mondays at 07:30 UTC
- Monthly statements scheduled to send on the 1st of the month at 08:45 UTC.
- Fee statements: this email can be set to send weekly or monthly to group, branch and/or contact level depending on your referrer settings. It prompts referrers to login to download a statement. To view the statement content, click here.
-
- Weekly statements scheduled to send on Mondays at 07:30 UTC
- Monthly statements scheduled to send on the 1st of the month at 08:45 UTC.
-
- No referrals in X days: this template is sent the number of days you specify since a referral has been received from a referral partner (e.g. if you set it to 7 days, then 7 days from the last lead referred this email will send to encourage further referrals).
- Activity statements: this email can be set to send weekly or monthly to group, branch and/or contact level depending on your referrer settings. It prompts referrers to login to download a statement. To view the statement content, click here.
-
Real-time emails
- Activate account: sent when you create an account and tick to send the activation email.
- Account activated: sent after the referral partner activates their account.
- Please sign terms: sent when you ask a partner to sign terms.
- Terms signed: sent when a partner has signed the terms and they have uploaded to the partner record.
Job update emails
These emails are designed to keep referral partners up to date on each referral sent through. The alert is sent through to the email on the referrer assigned to it. For example, if you have the referral partner plus features allowing you to add branches and contacts, updates will be sent to the contact or branch that sent the lead through (not all levels above that record too).
For full information on using the email template editor, check out our guide on editing email templates.
Managing your referral partners
On your referral partners table you can easily manage all of your referral partners.
Filter by:
- Referral partner
- Contact owner
- Last referral date
- Last activity date (when you last left a note, task, call or sent an email)
- Status (prospect, active, lost)
This enables you to see which partners are engaged and referring and which partners you’ve engaged with or not engaged with for a long time. The view button has 4 colours:
- Blue: no referrals received
- Green: last referral in the last 30 days
- Yellow: last referral in the last 60 days
- Red: last referral in the last 90 days
Referrer status
The referrer status is designed to help you manage both active referral partners (and whether they are sending leads regularly) and prospects that you don’t yet work with but are hoping to build a relationship to convert them into a referrer. The status works as follows:
- Prospect – you can add referral partners at this stage that you don’t yet work with to see who you’re hoping to bring on board. Filter by this stage to find partners you need to keep engaging with to move to a referrer.
- Prospect – terms sent – when sending terms (referrer plus feature) the status will automatically move to this stage. It can manually be moved to this stage if you send terms offline.
- Live – once terms are signed the status will move to Live automatically
- Active – when a lead is sent through the status will move to active
- Lapsed – when no new leads have been received for 30 days, the status will moved to Lapsed. It will move back to active when another lead is received.
- Ended – when you mark the relationship as ended manually.
Action button
By using the action button you can:
- Archive an referral partner – once archived you can use the status filter to bring up any archived records and they can be unarchived if required
- Reassign an referral partner – either to a new account manager or you can move the record to another group or branch if needed.
- Delete – you can delete the referral partner completely. They will still remain tied to any leads/jobs sent through to enable reporting. You can only delete a referrer group once any associated branches/contacts are deleted or reassigned.
Fees due button
By using the fees due button you can view a table of fees due and mark different jobs as referral fee paid. Check out our guide on marking referral fees as paid for more details.
Viewing a referral partner record
Within an referral partner record you can:
- Overview tab:
- Edit the referral partner details
- Send terms to be signed (guide here)
- Add additional contacts at the group for tracking other points of contact
- Adjust the referral partners notification preferences
- View a list of quotes and jobs sent through
- Add notes related to that referral partner
- Set tasks (e.g. tasks you might set to touch base with an referral partner)
- Store documents related to the referral partner
- Log calls made
- Send and log emails to track your relationship and contact with a partner
- Export all group records including associated branches and contacts
- Reassign branches and contacts to other groups or branches
Level 2: Referral Partner Plus (Enterprise plan or bolt-on)
There are a number of additional settings available for the referral partner accounts depending on your plan level. Below are some of the additional settings that are available to you.
Additional basic referral link
The additional referral link offers an alternative to the unique customer quote form that each referral partner can be given. Leads submitted via this page will save with the job type as “Other” as this is not collected on the simple form. After speaking with the customer you can then:
- Edit the job type to the most appropriate service
- Submit the fee
- Publish the quote and choose if you send a welcome email or not
Note: you need to have the service type “Other – Residential” activated for the form to work. You can activate this service and hide it from your quote form by following this guide.
Adding Service Level Agreements (SLA)
You may have agreed a certain timeframe in which you would respond to any new leads that have come in. Under the settings section you can set an SLA in minutes. When a new lead comes in we will set a task time to follow up X minutes from the time the lead came in.
To calculate this, we will use your business working hours set under Settings > Account settings.
Here you can set which day of the week is your last working day and your start and finish time.
If a quote comes in at 16:30, you finish at 17:00, you start again at 09:00 and your response time is 60 minutes, we will set a task to call the customer at 09:30 the next working day.
Adding contacts
You can add branches and contacts under a group. This can be used to review who is providing you with the most leads from each firm.
On the quote form, the customer can be asked the “How did you hear about us” question and a list of contacts from the referral partner will appear for the customer to choose from. You can also manually assign the lead source and contact from the timeline page. Alternatively, each referral partner (group, branch or contact) has its own unique quote form and referrals can be made through each of those.
Referral partner statements
You can share fee and activity statements with referral partners. To do this, check out our guide on statements.
Adding Custom Fee Scales (part of the Referral Partner Plus level)
On accounts with the additional referral partner features you can add custom fee scales where you have specific agreements.
Adjust your referral partner settings: turn on custom fee scales for an referral partner
- Open your referral partner table (Dashboard > referral partner tab)
- Open the referral partner you want to add a custom fee scale to
- Click on the “Settings” tab
- Scroll down to “custom fee scale” under the “General settings” title
- Click “Yes” and press the blue “Save” button.
Create a fee scale: next we create the fee scale
- Navigate to Settings > Survey settings > Pricing Settings > Residential Pricing / Commercial Pricing
- Press “Add pricing table”
- Fill in the table ensuring you add bedrooms fees (even if £0) up to the number of bedrooms you’re happy to provide instant quoting for. For example, if you set that quotes go bespoke at 6 bedrooms then you’ll need to add bedroom pricing rows up to 5 bedrooms and set them all as £0 if there are no additional fees.
- Once filled in press save and wait for the green success notification.
- Refresh the page and select your new table from the dropdown to check you’re happy with how it saved.
Assign locations to the fee scale: the system needs to know which locations this fee scale is allowed to be active for. If no locations are assigned then the alert will be seen by customers saying you can’t provide quotes in the locations they are searching.
- Go to Settings > Survey settings > Pricing settings > Location settings
- Option 1: navigate to your main pricing table and click on the dropdown to the top right of that locations table. Select your custom fee scale from the list and we’ll automatically update your settings so that your fee scale works in the same locations as this direct table.
- Option 2: select your custom fee scale and assign postcodes manually like you would on a direct table. You can find the guide on location settings on this guide: https://support.surveybooker.co.uk/my-support/setting-up-your-pricing-tables/
Updating locations covered:
- If you update the direct locations associated to your direct pricing tables and custom fee scales have been assigned to those locations under the dropdown at the top right of that locations table, you will notice a red button that appears when adding or removing locations. Once you have made your updates, press the “Update referral partner fee scales” button to automatically update the locations assigned to your custom fee scales.